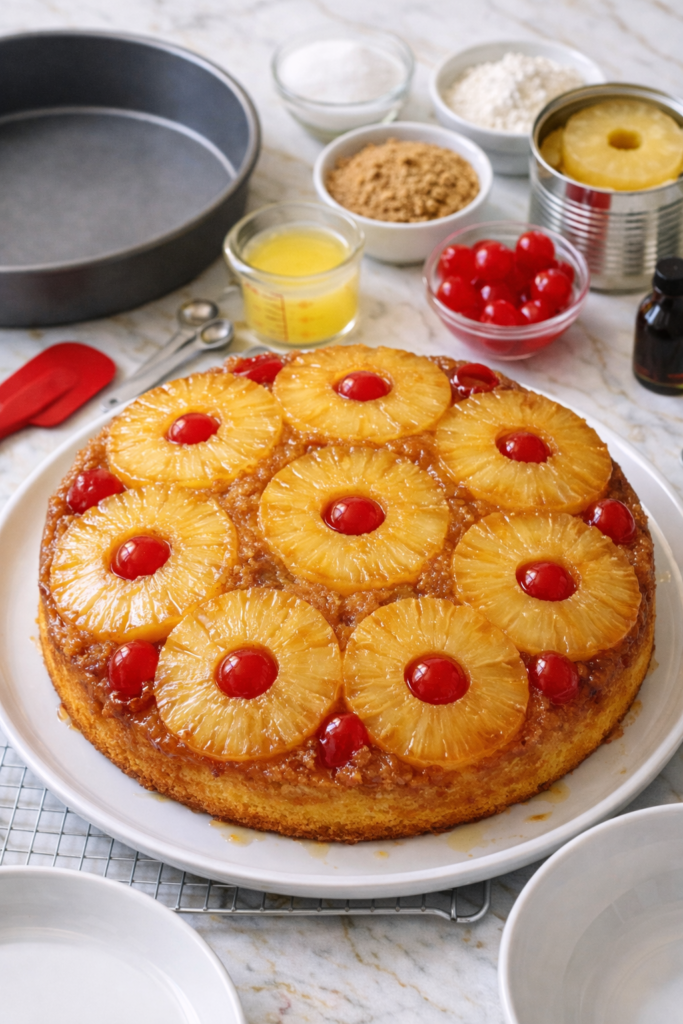
Ever wondered how something so simple can look this impressive?
This pineapple upside down cake is one of those recipes that makes everyone think you spent hours in the kitchen when really, you just layered some fruit and poured batter over it.
The caramelized pineapple on top (which starts on the bottom, hence the “upside down” part) gets this gorgeous golden color and the brown sugar turns into this sticky, sweet glaze that soaks into the cake.
It’s ridiculously good.
I first made this cake when I needed a dessert for a dinner party and didn’t want to stress. Turns out, it’s pretty foolproof.
You can make it in advance, it looks stunning, and people will be asking for the recipe before they’ve even finished their first slice.
So if you’re looking for a dessert that tastes homemade but doesn’t require fancy skills, this is it.
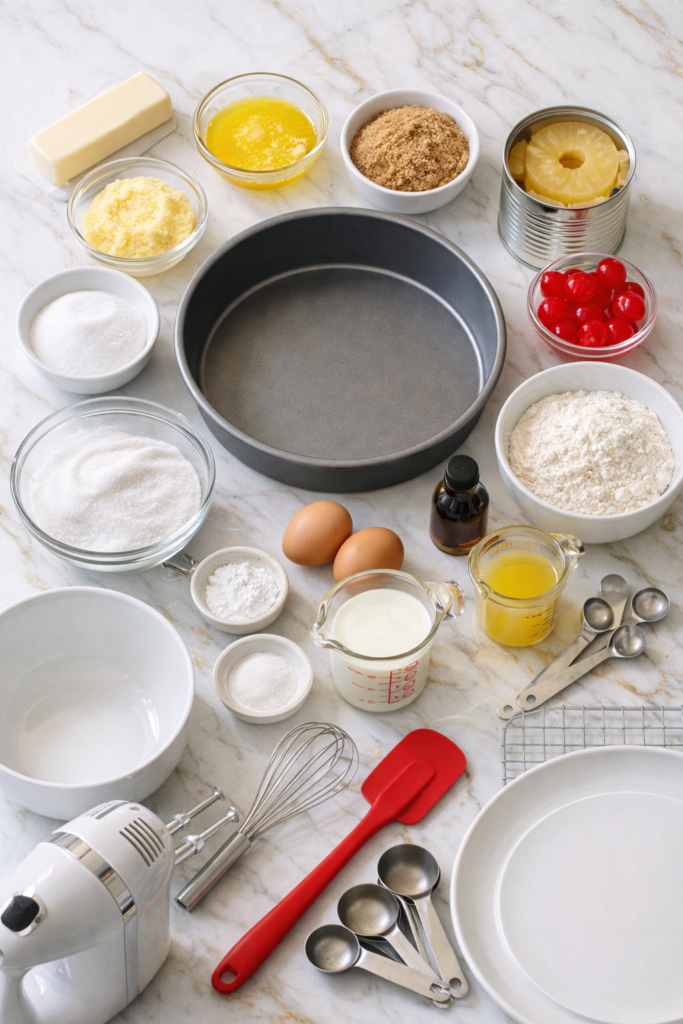
What You’ll Need
For the Topping:
| Ingredient | Amount | Notes |
|---|---|---|
| Unsalted butter | 1/4 cup (4 tbsp) | Must be melted |
| Light brown sugar | 2/3 cup, packed | Creates the caramel |
| Pineapple rings | 1 (20-oz) can | About 7-8 rings, drained well |
| Maraschino cherries | 7-8 cherries | Optional but classic |
For the Cake:
| Ingredient | Amount | Temperature |
|---|---|---|
| All-purpose flour | 1 1/2 cups | Room temp |
| Baking powder | 1 1/2 tsp | Fresh! |
| Salt | 1/4 tsp | – |
| Unsalted butter | 1/2 cup (1 stick) | Softened |
| Granulated sugar | 3/4 cup | – |
| Large eggs | 2 eggs | Room temp |
| Vanilla extract | 1 tsp | Pure, not imitation |
| Whole milk | 1/2 cup | Room temp |
| Pineapple juice | 1/4 cup | Reserved from can |
Quick Tip: Room temperature ingredients = better texture. Set eggs and milk out 30 minutes before baking.
Tools You’ll Need
✓ 9-inch round cake pan (or 10-inch cast iron skillet)
✓ Medium mixing bowl
✓ Large mixing bowl
✓ Electric mixer (hand or stand)
✓ Whisk
✓ Rubber spatula
✓ Measuring cups and spoons
✓ Wire cooling rack
✓ Serving plate (larger than your pan)
✓ Parchment paper
✓ Oven mitts (you’ll need these!)
Pro Tips
1. Drain Like Your Cake Depends On It (Because It Does)
Pat those pineapple rings dry with paper towels before arranging them.
Too much moisture = soggy bottom instead of caramelized perfection. Nobody wants a sad, soggy cake.
2. The Temperature Thing Isn’t Negotiable
Cold eggs and milk won’t incorporate smoothly into your batter.
The result? Dense, uneven texture.
Just set them on the counter 30 minutes before you start. Easy fix.
3. Parchment Paper = Your Insurance Policy
Cut a circle to fit the bottom of your pan, even if it’s nonstick.
This is what stands between you and a cake that refuses to release. Trust me on this one.
4. The 10-Minute Rule
Let it cool for exactly 10 minutes after baking. Not 5, not 20.
This gives the caramel time to set slightly so it doesn’t slide off, but it’s still warm enough that the cake releases cleanly.
5. Cast Iron = Next Level
If you have a cast iron skillet, use it.
The heavy bottom distributes heat evenly and gives you an even better caramelized topping. Plus, you can serve it straight from the skillet for that rustic, “I totally meant to do this” look.
How to Make Pineapple Upside Down Cake
Step 1: Prep Your Pan
Preheat your oven to 350°F.
Melt the 1/4 cup butter in your cake pan over medium heat (or melt separately and pour in).
Sprinkle the brown sugar evenly over the melted butter. Remove from heat.
Grace’s Note: Don’t skip greasing the sides of your pan too. Even a quick spray helps everything release smoothly.
Step 2: Arrange the Fruit
Place the pineapple rings in a single layer over the brown sugar mixture.
You should fit one in the center and about 6-7 around the edges.
Put a cherry in the center of each ring. Set aside.
Visual Check: Your pan should look like a pineapple flower at this point. If it doesn’t, rearrange until it does. This is what people will see!
Step 3: Mix Your Dry Ingredients
In a medium bowl, whisk together:
- Flour
- Baking powder
- Salt
Set aside.
Step 4: Cream the Butter and Sugar
In a large bowl, beat the 1/2 cup softened butter and granulated sugar with an electric mixer on medium-high speed for about 3 minutes.
The mixture should look light and fluffy, almost like whipped frosting.
Why this matters: This step incorporates air into your cake. Skip it or rush it, and you’ll get a dense brick instead of a tender crumb.
Step 5: Add Eggs and Vanilla
Beat in the eggs one at a time, mixing well after each addition.
Add the vanilla extract and mix until combined.
The batter might look slightly curdled. That’s normal. Don’t panic.
Step 6: Alternate Wet and Dry
With the mixer on low speed:
- Add 1/3 of the flour mixture → mix until just combined
- Add 1/2 of the milk + pineapple juice → mix
- Add another 1/3 flour → mix
- Add remaining milk mixture → mix
- Add final 1/3 flour → mix just until combined
Stop as soon as you can’t see dry flour. Some small lumps are fine. Overmixing = tough cake.
Step 7: Pour and Smooth
Pour the batter evenly over the pineapple rings in the pan.
Use a spatula to smooth the top gently.
Step 8: Bake
Place in the oven and bake for 40-45 minutes.
| Doneness Test | What to Look For |
|---|---|
| Toothpick test | Clean or with few moist crumbs |
| Visual | Golden brown top |
| Touch test | Springs back when lightly pressed |
| Edges | Pulling away from pan sides |
Step 9: Cool Slightly
Remove from oven and let cool in the pan for exactly 10 minutes.
Set a timer. Seriously.
Step 10: The Flip
This is the moment of truth.
Run a knife around the edges to loosen any stuck spots.
Place your serving plate upside down on top of the pan.
Using oven mitts (it’s still hot!), hold the plate and pan together firmly and flip them over in one confident motion.
Let the pan sit on top for a minute, then carefully lift it off.
If anything sticks: Don’t stress. Just use a spatula to pop those pieces back into their spots on the cake. No one will ever know.
Step 11: Admire Your Work
Let it cool for at least 15-20 minutes before slicing.
Pour yourself a drink. You earned it. 🍹
Substitutions and Variations
Fruit Swaps
| Instead of Pineapple | Try This |
|---|---|
| Peaches | Canned or fresh, sliced thin |
| Apricots | Halved and pitted |
| Apples | Granny Smith, sliced 1/4-inch thick |
| Pears | Firm pears, sliced |
| Plums | Halved, skin on for color |
Other Tweaks
Skip the cherries: Not everyone’s a fan of maraschino cherries. Leave them out or use fresh raspberries, blackberries, or pecan halves instead.
Make it boozy: Add 2 tablespoons dark rum to the batter for a tropical twist. Or brush rum over the warm cake after flipping. Your call.
Try different sugars: Dark brown sugar gives deeper molasses flavor. Coconut sugar works too if you want something less refined.
Go dairy-free: Use plant-based butter and your favorite non-dairy milk. I’ve done this multiple times and the texture is nearly identical.
Add spice: 1 teaspoon cinnamon or 1/2 teaspoon cardamom in the batter adds warmth and complexity that’s really nice in fall.
Make Ahead Tips
Here’s a secret: this cake is better the next day.
The flavors meld together and the texture gets even more tender.
Timeline Options:
Night Before:
- Bake it
- Flip while warm
- Cool completely
- Cover loosely with plastic wrap
- Store at room temperature
2 Days Ahead:
- Same as above
- Keeps beautifully for up to 2 days
Way Ahead (Freezing):
- Wrap cooled cake tightly in plastic wrap
- Add layer of aluminum foil
- Freeze up to 3 months
- Thaw in fridge overnight
- Bring to room temperature before serving
Just the Topping:
- Prep topping in pan
- Cover with plastic wrap
- Refrigerate overnight
- Bring to room temperature before adding batter
Nutritional Breakdown
Per Slice (8 servings):
| Nutrient | Amount | % Daily Value* |
|---|---|---|
| Calories | 385 | – |
| Total Fat | 16g | 21% |
| Saturated Fat | 10g | 50% |
| Cholesterol | 75mg | 25% |
| Sodium | 150mg | 7% |
| Carbohydrates | 58g | 21% |
| Fiber | 1g | 4% |
| Sugars | 42g | – |
| Protein | 4g | 8% |
| Vitamin A | – | 12% |
| Calcium | – | 6% |
| Iron | – | 8% |
*Based on a 2,000 calorie diet
Diet Modifications:
- Lower sugar: Reduce granulated sugar to 1/2 cup (cake will be less sweet but still good)
- Gluten-free: Use 1:1 gluten-free baking flour
- Dairy-free: Swap all dairy as noted above
Serving Suggestions
This cake is rich, so a little goes a long way.
Perfect Pairings:
🍨 Classic: Warm cake + vanilla ice cream melting into the caramel
☁️ Light: Cold whipped cream (add a splash of rum if you’re feeling fancy)
☕ Brunch Vibes: Strong coffee or mimosas (the pineapple makes it brunch-appropriate, right?)
🍯 Extra Indulgent: Drizzle extra caramel sauce over individual slices
🥥 Tropical Twist: Sprinkle toasted coconut flakes on top
Plating Ideas:
| Occasion | Presentation |
|---|---|
| Casual dinner | Slice and serve with ice cream |
| Dinner party | Individual plates with whipped cream rosette |
| Brunch | Cut into wedges, dust with powdered sugar |
| Potluck | Serve from cast iron skillet (so rustic!) |
Leftovers and Storage
Room Temperature: Cover loosely and store for up to 3 days. The topping might lose some gloss but the flavor stays amazing.
Refrigerator: I don’t recommend this. The cake dries out faster. If you must, bring slices to room temperature before serving or warm gently in the microwave for 15 seconds.
Storage Don’ts: ❌ Don’t use airtight containers while warm (creates soggy condensation)
❌ Don’t wrap hot cake in plastic (same soggy problem)
❌ Don’t refrigerate unless you live somewhere extremely hot
FAQ
Why is my cake soggy on top after flipping?
You didn’t drain the pineapples well enough, or you flipped it too soon.
Make sure to pat the pineapple rings completely dry and wait the full 10 minutes before flipping.
Can I use fresh pineapple instead of canned?
You can, but you’ll need to cook it first.
Slice it into rings about 1/2-inch thick and sauté in a bit of butter and brown sugar for 3-4 minutes per side before arranging in the pan. Fresh pineapple has enzymes that can mess with cake texture if used raw.
My cake stuck to the pan. What did I do wrong?
Three possibilities:
- Pan wasn’t greased properly (even nonstick needs help)
- You waited too long to flip it
- You didn’t run a knife around edges first
The fix: Always use parchment paper as your insurance policy.
Can I make this in a different size pan?
| Pan Size | Adjustment |
|---|---|
| 10-inch cast iron | Thinner cake, same baking time |
| 8-inch pan | Taller cake, add 5-10 minutes baking time |
| 9×13 pan | Double the recipe, add 10 minutes |
Watch for that clean toothpick to know it’s done.
Do I have to use maraschino cherries?
Not at all. Try:
- Fresh cherries (pitted)
- Raspberries
- Blackberries
- Pecan halves
- Nothing (minimalist vibes)
Can I double the recipe?
Sure, but make two separate cakes rather than one giant one.
They’ll bake more evenly and flip more successfully. Plus, two cakes means you can experiment with different toppings on each.
How do I know when the cake is done?
Look for all three signs:
- Golden brown top
- Springs back when touched lightly
- Toothpick comes out clean or with few moist crumbs
Help! My brown sugar is hard as a rock.
Microwave it in a bowl with a damp paper towel on top for 20 seconds. Or put a slice of bread in the bag overnight to soften it.
Can I make mini versions?
Yes! Use a muffin tin. Put a small pat of butter and spoonful of brown sugar in each cup, add a pineapple chunk and cherry, then fill with batter. Bake for 20-25 minutes.
Wrapping Up
There’s something satisfying about flipping this cake and seeing that perfect caramelized pineapple topping reveal itself.
It’s one of those desserts that looks like you really know what you’re doing in the kitchen, but between you and me, it’s pretty forgiving. The brown sugar and butter do most of the heavy lifting in the flavor department.
Give it a try this weekend. Your kitchen will smell amazing and you’ll have a dessert that actually lives up to the hype.
Drop a comment below once you’ve made it. I want to know if you stuck with the classic pineapple and cherry combo or if you went rogue with something else.