Ever bite into a sandwich and think, “This is fine“?
That’s not happening here.
This paneer sandwich is crispy, spicy, tangy, and packed with flavor that’ll make you want to eat it three days in a row. I’m talking golden-brown bread, perfectly spiced paneer, and just enough crunch to keep things interesting.
Paneer sandwiches are huge in Indian street food, and once you try one, you’ll understand why.
The cheese has this amazing ability to soak up spices while staying firm and satisfying. It’s not melty like mozzarella, it’s more substantial, which means every bite feels like you’re actually eating something.
And here’s the thing: this isn’t complicated.
You don’t need any fancy equipment or hard-to-find ingredients. Just paneer, some spices, vegetables, and bread. That’s it.
I first tried a version of this at a small café in Mumbai, and I’ve been hooked ever since. The owner was flipping these sandwiches on a flat griddle, pressing them down until they were perfectly crispy and golden.
The smell alone had people lining up.
So let’s make this at home. You’re going to love it.
What You’ll Need
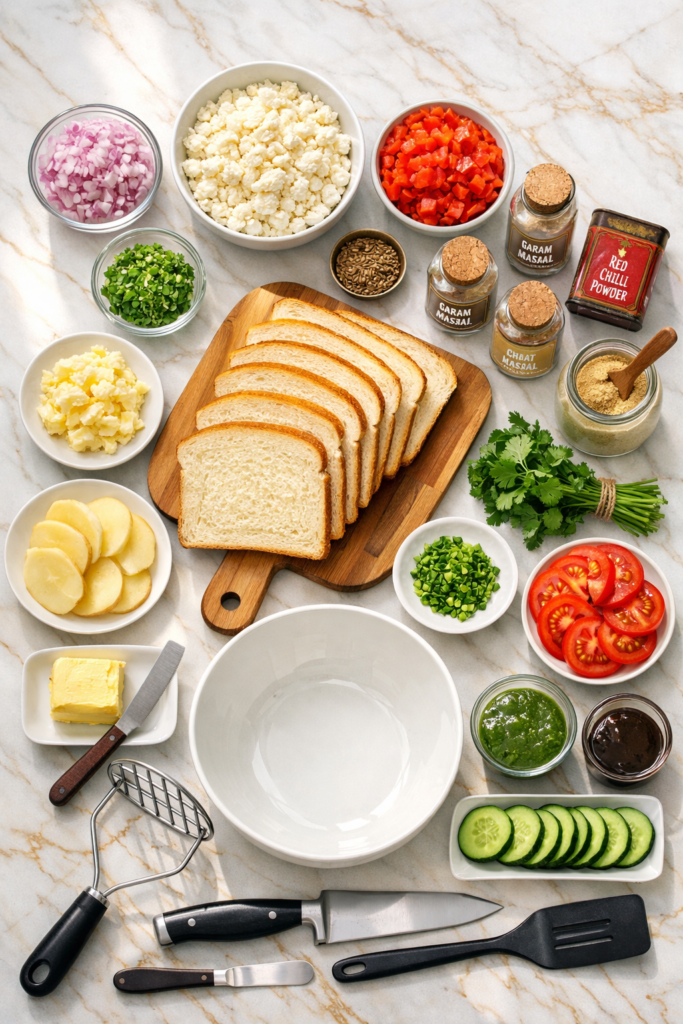
For the Paneer Filling
| Ingredient | Amount | Notes |
|---|---|---|
| Paneer | 200g | Crumbled or mashed |
| Onion | 1 small | Finely chopped |
| Tomato | 1 small | Finely chopped |
| Green chili | 1 | Adjust to taste |
| Fresh cilantro | 2 tbsp | Chopped |
| Cumin powder | ½ tsp | Essential for warmth |
| Garam masala | ½ tsp | Adds depth |
| Chaat masala | ½ tsp | The secret ingredient ✨ |
| Red chili powder | ¼ tsp | For color & heat |
| Amchur | ½ tsp | Or lemon juice |
| Salt | To taste | Don’t skip tasting |
For the Sandwich Assembly
| Ingredient | Amount | Purpose |
|---|---|---|
| Bread slices | 8 | Any type works |
| Butter | 2 tbsp | Softened, for spreading |
| Potato | 1 small | Boiled & sliced |
| Cucumber | 1 small | Thinly sliced |
| Tomato | 1 small | Fresh slices |
| Green chutney | As needed | Mint-cilantro |
| Tamarind chutney | Optional | Sweet-tangy magic |
For Cooking
Butter or ghee: 2-3 tablespoons for that golden, crispy exterior
Pro Tips
1. Drain Your Paneer Like Your Life Depends On It
If your paneer is store-bought and packed in water, drain it completely.
Press it between paper towels for 10 minutes.
Extra moisture = watery filling = soggy sandwich. Nobody wants that.
2. Don’t Skip the Chaat Masala
This is what gives the sandwich that authentic street food flavor.
It’s tangy, slightly salty, and has a hint of sulfur that sounds weird but tastes amazing. You can find it at any Indian grocery store or online.
Trust me on this one.
3. Press Your Sandwich While Cooking
Use a spatula to press down on the sandwich while it’s cooking.
This helps everything stick together and creates those beautiful golden-brown spots on the bread.
If you have a panini press or sandwich maker, even better.
4. Make Extra Filling
The paneer filling keeps well in the fridge for 2-3 days.
You can use it for wraps, stuff it in parathas, or just eat it with crackers.
It’s that good.
5. Get Your Bread Right
Slightly stale bread works better than fresh for grilled sandwiches.
It won’t get soggy as quickly and will crisp up beautifully.
If your bread is fresh, just toast it lightly before assembling.
Tools You’ll Need
✓ Large mixing bowl
✓ Cutting board and sharp knife
✓ Potato masher or fork
✓ Griddle, tawa, or large non-stick pan
✓ Spatula
✓ Small bowl for chutneys
✓ Knife for spreading
Substitutions and Variations
Can’t Find Paneer?
Use firm tofu. Press it well to remove excess water, then crumble and use the same way. The texture won’t be exactly the same, but it’ll still be delicious.
Bread Options
| Bread Type | Flavor Profile | Best For |
|---|---|---|
| White bread | Classic, neutral | Traditional taste |
| Whole wheat | Nutty, hearty | Healthier option |
| Multigrain | Complex, textured | Best of both worlds |
| Brioche | Rich, buttery | Special occasions |
| Sourdough | Tangy, chewy | Unique twist |
Spice Level Control
🌶️ Mild: Skip the green chili
🌶️🌶️ Medium: Use 1 green chili (as written)
🌶️🌶️🌶️ Hot: Add 2-3 green chilies or use jalapeños
Vegan Version
Simple swaps:
- Paneer → Firm tofu
- Butter → Vegan butter or oil
- Everything else stays the same
Add More Veggies
Great additions:
- Sliced bell peppers (red or yellow for sweetness)
- Grated carrots (adds crunch)
- Beetroot slices (earthy sweetness)
- Spinach leaves (extra nutrition)
Just keep everything thinly sliced.
Want More Cheese? 😋
Add a slice of regular cheese (cheddar or mozzarella) for extra richness.
This isn’t traditional, but it’s really good.
Make-Ahead Tips
Time-Saver Alert: The paneer filling can be made up to 3 days ahead and stored in an airtight container in the fridge. This actually makes weekday lunches super easy.
What you can prep ahead:
| Item | How Long | Storage |
|---|---|---|
| Paneer filling | 3 days | Airtight container, fridge |
| Boiled potatoes | 2 days | Covered container, fridge |
| Sliced vegetables | 1 day | Separate containers, fridge |
| Assembled sandwiches | Don’t do it | They’ll get mushy |
The golden rule: Only assemble when you’re ready to cook.
How to Make It
Step 1: Prepare the Paneer Filling
Take your paneer and crumble it into a large bowl.
You can use your hands or a fork. Don’t worry about making it super fine, some texture is good.
Add the chopped onion, tomato, green chili, and cilantro.
Sprinkle in the cumin powder, garam masala, chaat masala, red chili powder, and amchur.
Add salt to taste.
Mix everything together really well.
Taste it. Adjust the spices if needed. This mixture should be flavorful on its own.
💡 Pro Move: Let the filling sit for 10 minutes. The spices will bloom and the flavors will meld together beautifully.
Step 2: Prep Your Vegetables
Peel and thinly slice your boiled potato. You want rounds about ¼ inch thick.
Slice the cucumber and fresh tomato into thin rounds.
Get your chutneys ready. If you’re making them from scratch, do that first.
Keep everything organized. It makes assembly so much faster.
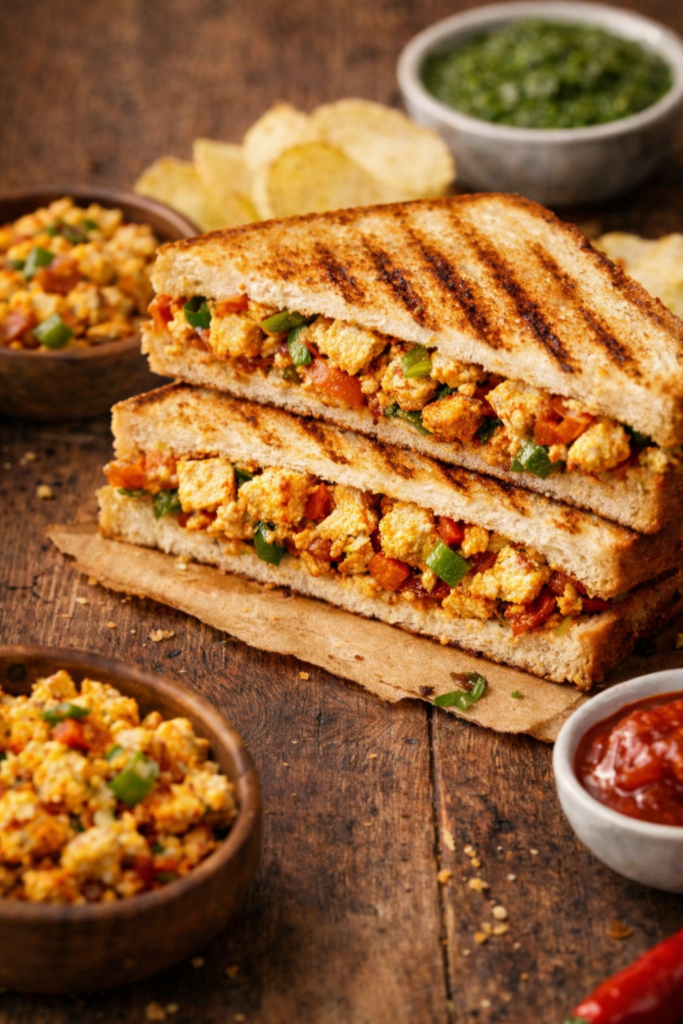
Step 3: Assemble the Sandwiches
The layering matters. Here’s the order:
- Bottom bread slice → Spread green chutney
- Potato layer → Creates moisture barrier
- Paneer filling → Be generous
- Cucumber slices → Adds crunch
- Tomato slices → Freshness
- Tamarind chutney → Optional drizzle
- Top bread slice → Butter the outside
Butter both outer sides of the bread. This is non-negotiable for crispy perfection.
Step 4: Grill the Sandwiches
Heat your griddle or pan over medium heat. Add a small amount of butter.
Place the sandwich on the hot surface.
Press down gently with a spatula.
Cook for 2-3 minutes until the bottom is golden brown and crispy.
Carefully flip the sandwich. Add a bit more butter to the pan if needed.
Press down again and cook for another 2-3 minutes until both sides are golden.
⚠️ Watch the heat: Too high and the bread burns before the inside warms. Too low and it gets greasy instead of crispy.
Step 5: Serve
Take the sandwich off the heat and let it cool for 1 minute.
This helps everything set.
Cut diagonally into triangles.
Serve immediately with extra chutney on the side, some chips, or just eat it as is.
Quick Reference: Cooking Times
| Step | Time | What to Look For |
|---|---|---|
| Prep paneer filling | 10 min | Well mixed, flavorful |
| Prep vegetables | 5 min | Thinly sliced |
| Assembly | 3 min per sandwich | Evenly layered |
| Grilling (side 1) | 2-3 min | Golden brown, crispy |
| Grilling (side 2) | 2-3 min | Golden brown, crispy |
| Total active time | 25-30 min | Makes 4 sandwiches |
Nutritional Breakdown
Per Sandwich (1 of 4)
| Nutrient | Amount | % Daily Value |
|---|---|---|
| Calories | 380 | 19% |
| Protein | 14g | 28% |
| Carbohydrates | 42g | 14% |
| Fat | 18g | 23% |
| Fiber | 4g | 14% |
| Sodium | 520mg | 23% |
| Calcium | 180mg | 14% |
Good source of protein and calcium from paneer
Pairing Suggestions
Drinks That Go Perfectly
☕ Masala chai – The classic pairing
🥤 Mango lassi – Sweet and cooling
🍋 Nimbu pani – Refreshing lemon water
🧊 Iced tea – Simple and satisfying
Side Dishes
Make it a meal:
- Crispy potato chips
- Cucumber raita
- Simple green salad
- Pickled onions
- Mint chutney dip
Leftovers and Storage
Storing the Filling
Fridge: 3 days in an airtight container
Freezer: Up to 1 month (thaw overnight in fridge)
Pro tip: It actually tastes better the next day after the flavors have had time to blend.
What NOT to Store
❌ Assembled sandwiches (they’ll get soggy)
❌ Grilled sandwiches (bread gets tough)
❌ Sandwiches with fresh vegetables already added
Reheating Done Right
| Method | Time | Result |
|---|---|---|
| Pan (recommended) | 3-4 min | Crispy & warm |
| Toaster oven | 5-6 min | Even heating |
| Air fryer | 3-4 min at 350°F | Extra crispy |
| Microwave | ❌ Don’t | Soggy disaster |
The rule: Heat on medium-low until warmed through and crispy again.
Creative Ways to Use Leftover Filling
🌯 Stuff it in pita bread
🍞 Use as a topping for toast
🥚 Mix into scrambled eggs
🌮 Roll it up in a tortilla for a quick wrap
🥖 Spread on a baguette with extra veggies
FAQ
Can I use store-bought paneer?
Yes. Most people do.
Just make sure you drain it well and pat it dry. Fresh paneer from an Indian grocery store will have better texture, but packaged works fine.
What if I can’t find amchur?
Use lemon juice instead.
Start with 1 teaspoon and adjust to taste. It won’t be exactly the same, but it’ll give you that tangy flavor.
Fresh lime juice works too.
Can I bake these instead of grilling?
You can, but they won’t have the same crispy, buttery exterior.
If you do bake them:
- Brush both sides with melted butter
- Bake at 375°F for 10-12 minutes
- Flip halfway through
How spicy is this sandwich?
With one green chili, it’s mild to medium.
You control the heat based on how much chili you add. You can leave it out completely for kids.
Do I have to use both chutneys?
Green chutney: Essential. It adds freshness and flavor.
Tamarind chutney: Optional but adds a sweet-tangy element that really makes the sandwich special.
Can I make this sandwich in advance for a party?
Make the filling ahead, but assemble and grill the sandwiches just before serving.
You can keep the grilled sandwiches warm in a 200°F oven for up to 30 minutes.
Cut them into smaller pieces for party servings.
What’s the difference between paneer and regular cheese?
Paneer doesn’t melt.
It holds its shape when heated, which makes it perfect for grilling and cooking.
It’s also fresh cheese with a mild, milky flavor that soaks up spices beautifully.
Can I add other vegetables?
Absolutely.
Great additions:
- Grated carrots
- Sliced bell peppers
- Spinach leaves
- Beetroot slices
- Avocado (not traditional but delicious)
Just make sure everything is thinly sliced or finely chopped.
Why do my sandwiches get soggy?
Common culprits:
| Problem | Solution |
|---|---|
| Wet paneer | Drain and press dry |
| Too much chutney | Use thin layer |
| Assembled too early | Only assemble when ready to cook |
| Low heat cooking | Increase to medium |
| Not enough butter | Don’t be shy with it |
Can I make these in a sandwich maker?
Yes! And it’s actually easier.
Preheat your sandwich maker, assemble the sandwiches, and cook for 4-5 minutes until golden and crispy.
Perfect every time.
Wrapping Up
This paneer sandwich is one of those recipes that looks simple but delivers way more flavor than you’d expect.
The combination of spiced paneer, crunchy vegetables, tangy chutneys, and crispy buttered bread is just really, really good.
It’s the kind of sandwich you’ll want to make again and again.
And the beauty of it is that you can adjust everything to your taste.
Want it spicier? Add more chili.
Prefer it milder? Skip it.
Love extra veggies? Load them in.
Make it your own.
Once you’ve made this, come back and let me know how it turned out.
Did you change anything? Did you add your own twist?
I love hearing how people make recipes their own.
Drop a comment below with your experience or any questions. And if you loved it, share it with someone who needs a better lunch option.
Happy cooking! 🥪