Here’s the properly formatted version:
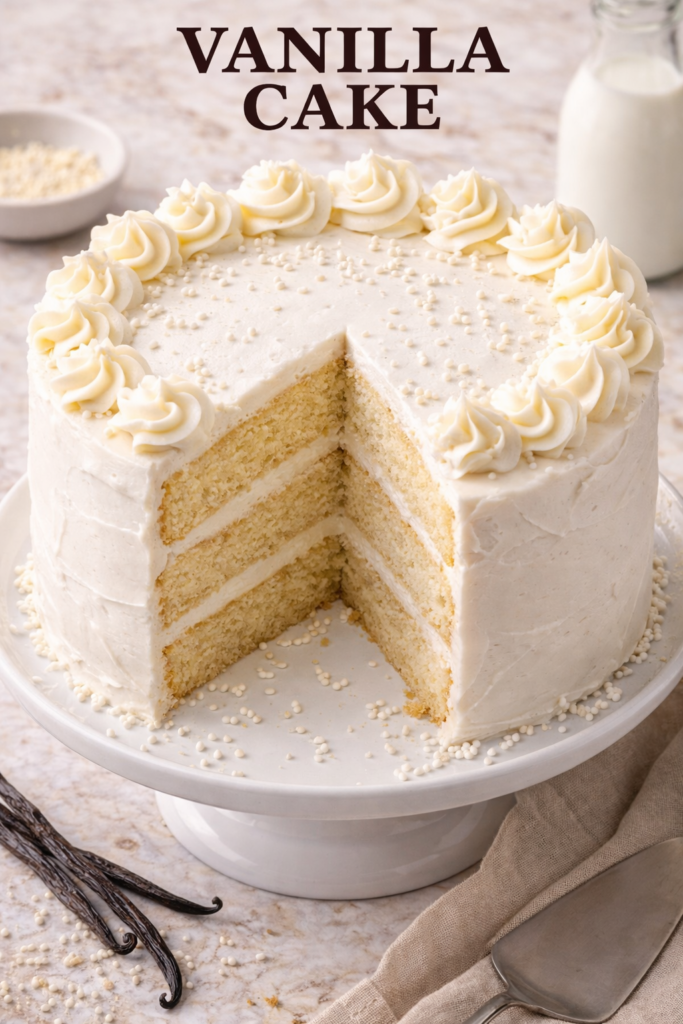
Forget everything you think you know about vanilla cake being boring.
This isn’t the dry, crumbly mess you get from a box mix or the flavorless disappointment from your local grocery store bakery. This is the kind of vanilla cake that makes people ask for seconds before they’ve even finished their first slice.
I’ve tested this recipe at least a dozen times (my waistline can confirm), tweaking the ratios until I got that perfect tender crumb and buttery flavor that just melts in your mouth.
And honestly? It’s become my go-to for birthdays, celebrations, or just random Tuesday nights when I need something sweet.
The best part is how simple it is. You don’t need fancy equipment or hard-to-find ingredients.
Just basic pantry staples and about 10 minutes of actual hands-on time.
What You’ll Need
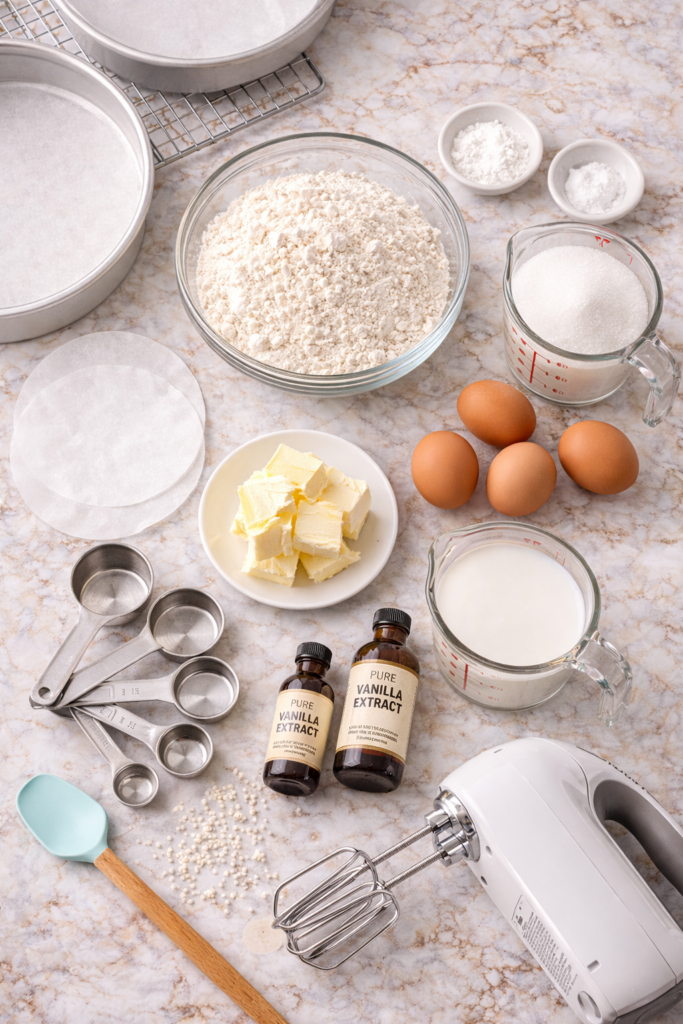
Dry Ingredients
| Ingredient | Amount |
|---|---|
| All-purpose flour | 2 ¾ cups |
| Baking powder | 2 ½ teaspoons |
| Salt | ½ teaspoon |
| Granulated sugar | 1 ¾ cups |
Wet Ingredients
| Ingredient | Amount | Notes |
|---|---|---|
| Unsalted butter | 1 cup | Softened to room temp |
| Large eggs | 4 | Room temperature |
| Whole milk | 1 cup | Room temperature |
| Pure vanilla extract | 2 teaspoons | Don’t use imitation |
| Almond extract | ½ teaspoon | The secret weapon! 🤫 |
Tools You’ll Need
Getting the right tools makes this so much easier:
✓ Two 9-inch round cake pans
✓ Electric mixer (stand or hand mixer works)
✓ Medium mixing bowl
✓ Large mixing bowl
✓ Measuring cups and spoons
✓ Rubber spatula
✓ Cooling rack
✓ Parchment paper
✓ Toothpick or cake tester
You probably have most of this already.
The only thing worth investing in if you don’t have it is a good electric mixer. Creaming butter and sugar by hand is possible, but it’s exhausting.
Pro Tips
1. Room temperature ingredients are non-negotiable
Cold eggs and milk will make your butter seize up and create a lumpy batter.
Take everything out of the fridge at least 30 minutes before you start.
Quick fix: Put your eggs in warm water for 5 minutes and microwave your milk for 15 seconds.
2. Don’t skip the almond extract
I know it sounds weird, but that tiny bit of almond extract enhances the vanilla flavor in a way that’s hard to describe.
It doesn’t taste like almonds at all. It just makes the whole cake taste more like “vanilla” if that makes sense.
“The almond extract trick changed my baking game forever. Now all my vanilla cakes taste like they came from a professional bakery!” – Sarah, home baker
3. Measure your flour correctly
Scoop and level, don’t pack. Or better yet, use a kitchen scale.
Too much flour is the number one reason cakes turn out dry and dense. I learned this the hard way after making way too many hockey pucks disguised as cakes.
The right way:
- Fluff the flour with a spoon
- Scoop into your measuring cup
- Level off with a straight edge
The wrong way:
- Packing flour into the cup
- Scooping directly from the bag
- Eyeballing measurements
4. The toothpick test is your friend
Don’t trust the timer blindly. Ovens vary like crazy.
Start checking at 25 minutes by inserting a toothpick in the center. It should come out with just a few moist crumbs, not wet batter.
5. Let the cakes cool completely before frosting
I know it’s tempting to rush this part. But warm cake will make your frosting melt and slide right off.
Be patient. Go watch an episode of your favorite show while you wait.
How to Make the Perfect Vanilla Cake
Step 1: Prep your pans (2 minutes)
Preheat your oven to 350°F (175°C).
Grease your cake pans with butter or cooking spray, then line the bottoms with parchment paper circles. Grease the parchment too.
This double insurance keeps your cakes from sticking.
Step 2: Mix the dry ingredients (1 minute)
Whisk together the flour, baking powder, and salt in a medium bowl. Set it aside.
Step 3: Cream the butter and sugar (4 minutes)
In your large bowl, beat the softened butter and sugar together with your electric mixer on medium-high speed.
This takes about 3-4 minutes. You want it to look pale and fluffy, almost like vanilla ice cream.
Why this matters: This is where you’re incorporating air into the batter, which helps your cake rise and creates that tender texture.
Step 4: Add the eggs (2 minutes)
Add your eggs one at a time, beating well after each addition.
The mixture might look a little curdled. That’s totally normal and fine.
Step 5: Add the extracts (30 seconds)
Mix in both the vanilla and almond extracts.
Step 6: Alternate wet and dry (3 minutes)
Here’s the pattern:
- Add ⅓ of your flour mixture → mix until just combined
- Pour in half the milk → mix until just combined
- Another ⅓ of flour → mix
- Remaining milk → mix
- Final ⅓ of flour → mix
The golden rule: Stop mixing as soon as you don’t see streaks of flour anymore.
Overmixing develops gluten, which makes your cake tough and chewy instead of tender.
Step 7: Divide and bake (28-32 minutes)
Divide the batter evenly between your two prepared pans. A kitchen scale makes this easy, but eyeballing it works too.
Tap the pans gently on the counter a few times to release any air bubbles.
Bake for 28-32 minutes, until:
- The tops spring back when lightly pressed
- A toothpick comes out with just a few moist crumbs
- The edges pull away slightly from the pan
Step 8: Cool properly (1 hour+)
Let the cakes cool in the pans for 10 minutes. This lets them set up enough to handle without breaking.
Then turn them out onto a cooling rack and let them cool completely, at least an hour.
Timeline at a glance:
| Step | Time |
|---|---|
| Prep & mix | 10 minutes |
| Baking | 30 minutes |
| Cooling in pan | 10 minutes |
| Cooling on rack | 60+ minutes |
| Total | About 2 hours |
Substitutions and Variations
Common Swaps
| Original | Substitute | Result |
|---|---|---|
| All-purpose flour | Cake flour (3 cups) | Even more tender |
| Whole milk | Buttermilk | Slight tang, super moist |
| Whole milk | 2% milk | Works, less rich |
| Butter | Margarine | Less flavor |
| Almond extract | Lemon zest | Fresh, citrusy |
Flavor Variations
Lemon Vanilla Cake: Add 2 tablespoons of lemon zest to the batter
Coconut Vanilla Cake: Replace almond extract with coconut extract
Brown Butter Vanilla Cake: Brown the butter first, then let it cool and resolidify before using
Vanilla Bean Cake: Add the seeds from 2 vanilla beans along with the extract
Dietary Modifications
Gluten-free: Use a 1:1 gluten-free flour blend (Bob’s Red Mill works great)
Dairy-free: Swap butter for dairy-free butter and use almond or oat milk
Reduced sugar: Drop to 1 ½ cups sugar (especially if using sweet frosting)
Make Ahead Tips
This cake actually tastes better the next day. The flavors meld together and the texture becomes even more tender.
Your Options:
Bake and freeze:
- Bake the cake layers
- Wrap tightly in plastic wrap, then foil
- Freeze for up to 3 months
- Thaw in fridge overnight before frosting
Bake ahead:
- Make layers up to 2 days in advance
- Wrap well and store at room temperature
- Actually easier to frost because they’re more stable
Batter:
- Refrigerate batter for up to 4 hours before baking
- Let it sit at room temp for 15 minutes before baking
- May need to add 1-2 minutes to bake time
Nutritional Breakdown
Per slice (12 slices, unfrosted):
| Nutrient | Amount |
|---|---|
| Calories | 320 |
| Fat | 14g |
| Carbohydrates | 45g |
| Protein | 5g |
| Sugar | 25g |
| Sodium | 180mg |
Note: These are approximate values and will vary based on your exact ingredients and portion sizes.
Perfect Pairings
This vanilla cake is super versatile. Here’s what works really well with it:
Frostings That Shine
🎨 American Buttercream – Classic, sweet, easy
🧀 Cream Cheese Frosting – Tangy balance
☁️ Swiss Meringue Buttercream – Silky, not too sweet
🍫 Chocolate Ganache – Rich contrast
Fresh Add-ons
🍓 Strawberries
🫐 Blueberries
🍇 Raspberries
🥭 Mango slices
Drinks
☕ Coffee (hot or iced)
🥛 Cold milk
🍾 Champagne for celebrations
🍵 Earl Grey tea
Ice Cream
Vanilla bean (trust me on this)
Chocolate
Strawberry
Salted caramel
Leftovers and Storage
Storage Guide
| Storage Method | Duration | Best For |
|---|---|---|
| Room temp (unfrosted, wrapped) | 3 days | Unfrosted layers |
| Room temp (frosted, covered) | 2-3 days | Non-dairy frostings |
| Refrigerated (covered) | 5 days | Cream cheese frosting |
| Frozen (wrapped well) | 3 months | Long-term storage |
Pro tip: Freeze individual slices wrapped in plastic wrap and foil for easy single servings. They’ll last up to 3 months. Thaw at room temperature for a couple hours.
Stale Cake Hack
If your cake starts to dry out:
- Cube it up and make cake truffles
- Use it as a base for trifle
- Toast slices and top with ice cream
- Make cake pops
FAQ
Why did my cake sink in the middle?
Common causes:
- Oven temperature too high
- Opening the oven door too early
- Undermixed batter
- Too much leavening
Fix: Use an oven thermometer and don’t peek until at least 25 minutes in.
Can I make this as cupcakes instead?
Absolutely! This recipe makes about 24 cupcakes.
Fill the liners ⅔ full and bake for 18-22 minutes at 350°F.
Can I use this recipe for a sheet cake?
Yes! Pour the batter into a greased 9×13 inch pan and bake for 30-35 minutes.
My cake turned out dense. What happened?
Most likely culprits:
- Overmixing after adding flour
- Using too much flour (measure correctly!)
- Not creaming butter and sugar long enough
- Eggs or milk were too cold
Do I really need both vanilla and almond extract?
The almond extract really does make a difference, but it’s not absolutely required.
The cake will still be good without it, just less flavorful.
Think of it like salt in chocolate chip cookies. Technically optional, but you’ll miss it.
Can I make this dairy-free?
You can substitute the butter with dairy-free butter and use almond or oat milk instead of regular milk.
The texture will be slightly different but still good.
How do I get perfectly level cake layers?
Option 1: Use baking strips on your pans (make them with wet paper towels and foil)
Option 2: Trim off the dome with a serrated knife once cooled
Option 3: Accept the dome and put the rounded sides together when stacking
Why is my cake sticking to the pan?
Checklist:
- Did you grease the pan well?
- Did you use parchment paper on the bottom?
- Did you grease the parchment too?
- Did you wait exactly 10 minutes before removing?
Too soon and it falls apart, too long and it sticks.
Can I halve this recipe?
Yes! Makes one 9-inch layer or 12 cupcakes.
Bake time stays the same.
Help! My frosting is melting off the cake!
Your cake is still warm.
Let it cool completely (it should feel room temperature to the touch) before frosting.
You can speed this up by putting the layers in the fridge for 30 minutes.
Wrapping Up
This vanilla cake has saved me so many times.
Last-minute birthday parties, potlucks, just because Wednesdays when I needed something comforting.
The first time I made it, I was honestly shocked at how much better it was than any box mix I’d ever tried. And now I can’t imagine going back.
Give it a try this weekend. Your kitchen will smell incredible, and you’ll have the kind of cake that makes people think you went to some fancy bakery.
Drop a comment below and let me know how yours turns out! Did you add any fun flavors? What frosting did you pair it with? I love hearing about your baking wins (and fails, we’ve all been there).