You know what’s funny about red velvet cake?
Most people think it’s just chocolate cake with food coloring. And that’s exactly why they’ve been making it wrong this whole time.
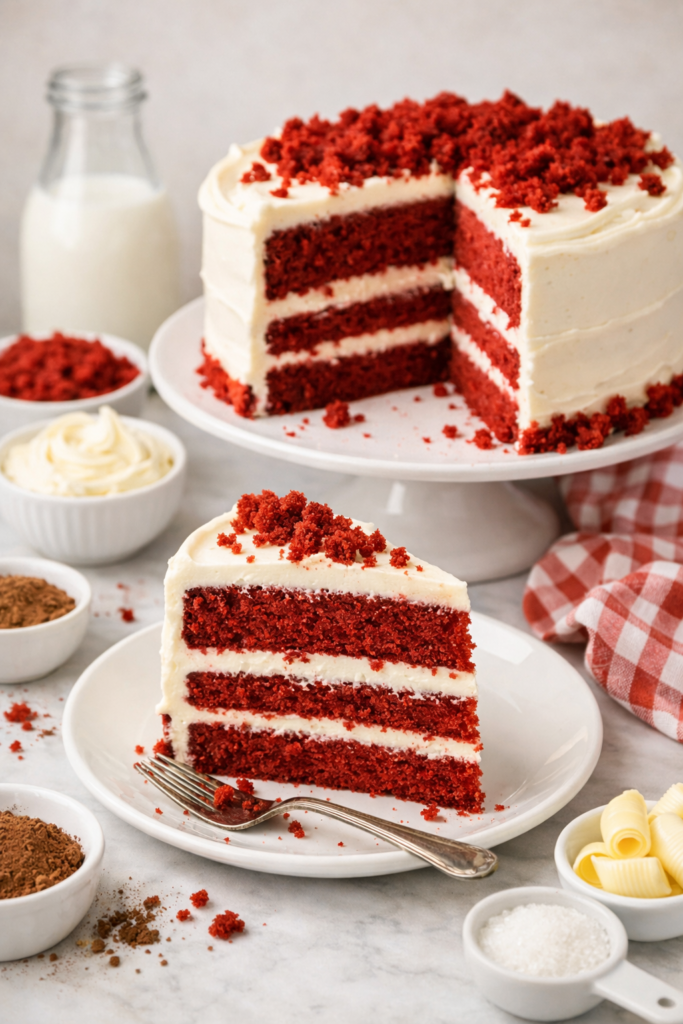
Real red velvet has its own personality. It’s tangy from buttermilk, soft like clouds, and has this subtle cocoa flavor that doesn’t scream chocolate but whispers it. The cream cheese frosting? That’s not negotiable.
I’ve been making this cake for years and I’m telling you right now: once you nail this recipe, you’ll understand why people lose their minds over it. It’s not complicated, but there are a few tricks that separate the okay cakes from the ones people text you about three days later.
Let me show you how it’s done.
What You’ll Need
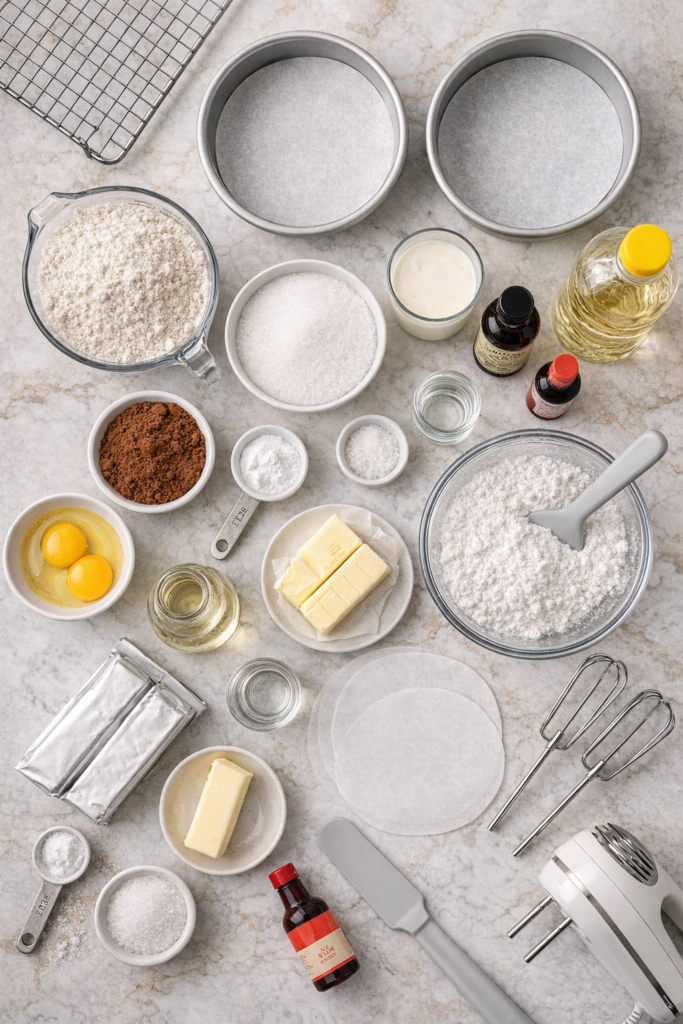
For the Cake:
| Ingredient | Amount | Notes |
|---|---|---|
| All-purpose flour | 2½ cups | Spoon and level, don’t pack |
| Granulated sugar | 1½ cups | Regular white sugar |
| Unsweetened cocoa powder | 3 tablespoons | Not Dutch-process |
| Baking soda | 1 teaspoon | Fresh for best rise |
| Salt | 1 teaspoon | Fine sea salt works great |
| Large eggs | 2 | Room temperature |
| Vegetable oil | 1½ cups | Or canola oil |
| Buttermilk | 1 cup | Must be room temp |
| Red food coloring | 2 tablespoons | Gel gives deeper color |
| Vanilla extract | 2 teaspoons | Pure, not imitation |
| White vinegar | 1 teaspoon | This is the secret! |
For the Cream Cheese Frosting:
| Ingredient | Amount | Temperature |
|---|---|---|
| Cream cheese | 16 oz (2 blocks) | Softened, not melted |
| Unsalted butter | ½ cup (1 stick) | Room temperature |
| Powdered sugar | 4 cups | Sifted if lumpy |
| Vanilla extract | 2 teaspoons | Pure extract |
| Salt | Pinch | Balances sweetness |
Tools You’ll Need
Essential:
- Two 9-inch round cake pans
- Parchment paper circles
- Large mixing bowl
- Medium mixing bowl
- Electric mixer (hand or stand)
For Assembly:
- Cooling rack
- Offset spatula
- Rubber spatula
- Toothpick
- Cake stand or serving plate
Nice to Have:
- Bench scraper (for smooth frosting)
- Kitchen scale (for even layers)
- Cake turntable (makes frosting easier)
Pro Tips
🌡️ Temperature is everything.
Cold ingredients won’t emulsify properly with the oil. You’ll end up with a dense, heavy cake instead of that signature fluffy texture. Set everything out 30 minutes before you start.
🥄 The mixing method matters.
Once you add the flour, mix just until you can’t see white streaks. Overmixing = tough cake. We’re going for tender here, not bread.
❄️ Cool completely before frosting.
I cannot stress this enough. Even slightly warm cake will turn your cream cheese frosting into soup. Give it a full hour on the cooling rack. Go watch an episode of something.
🎨 Gel food coloring is your friend.
Liquid works, but gel gives you that deep red color without watering down your batter. You’ll use less of it too. Worth the $4 at the grocery store.
🔪 Level those layers.
See that dome on top? Cut it off with a serrated knife. Flat layers = professional-looking cake. Plus you get to eat the scraps while you frost. Win-win.
The Science Behind Red Velvet
Ever wonder what makes red velvet different from regular chocolate cake?
The magic is in the chemistry. When you mix buttermilk and vinegar (both acidic) with baking soda (alkaline), you create a reaction that makes the cake super tender and gives it a fine crumb. The cocoa powder also reacts with the acid, which brings out a reddish tint naturally – though not enough to skip the food coloring.
This is why you can’t just swap ingredients randomly. Everything has a purpose.
How to Make Red Velvet Cake
Step 1: Prep Everything (5 minutes)
Preheat your oven to 350°F.
Grease two 9-inch round pans with butter or cooking spray. Line the bottoms with parchment paper circles. This combo = zero sticking.
Take your eggs, buttermilk, cream cheese, and butter out of the fridge. They need to be room temp before you start mixing.
Quick temp check: Press your finger into the butter. It should leave an indent but not be greasy. That’s perfect.
Step 2: Mix the Dry Ingredients (2 minutes)
Grab your large bowl. Whisk together:
- Flour
- Sugar
- Cocoa powder
- Baking soda
- Salt
Make sure there are no cocoa lumps hiding in there. They’ll show up as brown spots in your red cake and that’s not cute.
Step 3: Combine the Wet Ingredients (3 minutes)
In your medium bowl, whisk the eggs until broken up. Then add:
- Oil
- Buttermilk
- Food coloring (yes, it looks like a lot)
- Vanilla
- Vinegar
Whisk until everything’s smooth and seriously red. Like, unnaturally red. That’s what we want.
Step 4: Bring It Together (2 minutes)
Pour the wet ingredients into the dry ingredients.
Use your rubber spatula and fold gently. Mix just until you can’t see flour anymore. The batter will be thin – almost pourable. That’s completely normal and actually what you want.
Don’t panic about the consistency. Thin batter = moist cake.
Step 5: Bake (30 minutes)
Divide the batter evenly between your two pans. I eyeball it, but if you’re Type A, use a scale.
Bake for 28-32 minutes. Start checking at 28 minutes with a toothpick. You want it to come out with just a few moist crumbs, not wet batter.
The cakes should spring back when you lightly press the center.
Step 6: Cool Down (1 hour)
Let the cakes cool in the pans for exactly 10 minutes. Not 5, not 15. Ten.
Then flip them onto your cooling rack and let them cool completely. This takes about an hour. Yes, really.
While you wait, make the frosting. Or scroll TikTok. Your choice.
Step 7: Make the Frosting (10 minutes)
Beat the softened cream cheese and butter together until they’re super smooth and fluffy. This takes about 3 minutes with an electric mixer on medium-high speed.
They should look pale and creamy, with no lumps.
Add the powdered sugar one cup at a time. Mix on low speed until incorporated, then bump it to medium. Scrape down the sides between additions.
Mix in the vanilla and salt. Beat for another 2 minutes until it’s light and fluffy.
Taste test: The frosting should be sweet but not cloying, with a slight tang from the cream cheese.
Step 8: Assemble (15 minutes)
Place one cake layer on your serving plate. If it has a dome, cut it off first with a serrated knife.
Scoop about 1½ cups of frosting onto the center. Use your offset spatula to spread it almost to the edges, leaving about ½ inch bare.
Why? When you add the second layer, the frosting will spread to the edges. If you go all the way now, it’ll squeeze out everywhere.
Place the second cake layer on top. Cut off any dome on this one too so it sits flat.
Now for the crumb coat: spread a super thin layer of frosting all over the cake. You should still see cake through it. This seals in the crumbs.
Pop it in the fridge for 15 minutes. This firms up the crumb coat so your final layer goes on smooth.
Final frosting: Use the rest of the frosting to cover the entire cake in a thick, beautiful layer. Use your offset spatula or a bench scraper for smooth sides.
Substitutions and Variations
Common Swaps
| Original | Substitute | Notes |
|---|---|---|
| Buttermilk | 1 cup milk + 1 tbsp vinegar | Let sit 5 minutes before using |
| Vegetable oil | Melted coconut oil | Adds subtle coconut flavor |
| Red food coloring | ¼ cup beet juice | Color won’t be as vibrant |
| All-purpose flour | Gluten-free 1:1 blend | Results may be slightly denser |
Fun Variations to Try
🍫 Chocolate cream cheese frosting: Add ¼ cup cocoa powder to the frosting recipe. Game changer.
🧁 Red velvet cupcakes: Use the same batter to make 24 cupcakes. Bake at 350°F for 18-22 minutes.
🍰 Sheet cake version: Pour into a greased 9×13 pan. Bake 35-40 minutes.
☕ Espresso red velvet: Add 2 teaspoons instant espresso powder to the dry ingredients. The coffee flavor intensifies the chocolate notes.
🍓 Strawberry filling: Spread strawberry jam between the layers before adding frosting. So good.
Make Ahead Tips
Freeze the cake layers:
Wrap them tightly in plastic wrap, then aluminum foil. They’ll keep in the freezer for up to 3 months. Thaw in the fridge overnight before frosting.
This is honestly my favorite way to work. Bake the cakes when you have time, frost them when you need them.
Make the frosting ahead:
Store in an airtight container in the fridge for up to 3 days. Let it come to room temperature and give it a quick whip with the mixer before using.
Fully assembled cake:
Store it covered in the fridge for up to 5 days. Let it sit at room temperature for 30 minutes before serving so the cake softens and the frosting gets creamy again.
Nutritional Breakdown
Per slice (based on 12 slices):
| Nutrient | Amount | % Daily Value* |
|---|---|---|
| Calories | 580 | – |
| Total Fat | 32g | 41% |
| Saturated Fat | 11g | 55% |
| Cholesterol | 75mg | 25% |
| Sodium | 340mg | 15% |
| Total Carbs | 68g | 25% |
| Fiber | 1g | 4% |
| Sugars | 52g | – |
| Protein | 5g | 10% |
*Based on a 2,000 calorie diet
Listen, this is dessert. It’s supposed to be indulgent. Don’t stress about the numbers on your birthday. 🎂
Perfect Pairings
What to Serve With Red Velvet Cake
☕ Dark roast coffee The slight bitterness cuts through the sweetness perfectly. My go-to is a strong French roast.
🥂 Champagne or prosecco This feels fancy and the bubbles cleanse your palate between bites. Great for celebrations.
🍦 Vanilla ice cream Serve the cake slightly warm with a scoop on the side. The temperature contrast is chef’s kiss.
🍓 Fresh berries Raspberries or strawberries add a tart contrast that makes the cream cheese frosting pop even more.
🥛 Cold milk Classic for a reason. Especially if you’re eating this as a late-night snack (no judgment).
Time Investment
Here’s the honest breakdown:
| Task | Time Required |
|---|---|
| Prep ingredients | 15 minutes |
| Mix batter | 10 minutes |
| Bake cakes | 30 minutes |
| Cool cakes | 60 minutes |
| Make frosting | 10 minutes |
| Assemble & frost | 20 minutes |
| Total active time | 55 minutes |
| Total time | 2 hours 25 minutes |
You can break this up over two days if you’re not in a rush. Bake the cakes one day, frost them the next. Way less stressful.
Storage & Leftovers
How to Keep It Fresh
Room temperature (24 hours max): If you’re eating it within a day, you can leave it covered on the counter. Any longer and the cream cheese frosting needs refrigeration.
In the fridge (up to 5 days): Cover it well or store in an airtight container. The cake actually gets more moist after a day in the fridge as the flavors meld.
Freezing (2-3 months): Individual slices freeze great. Wrap each slice in plastic wrap, then put them all in a freezer bag. Thaw in the fridge overnight.
Leftover Hacks
🍰 Cake pops: Crumble leftover cake, mix with frosting, roll into balls, dip in melted chocolate.
🧈 French toast: Use slices as French toast. Sounds weird, tastes amazing.
🍨 Ice cream mix-in: Crumble pieces into vanilla ice cream for an instant red velvet ice cream.
Troubleshooting Common Issues
“My cake is brown, not red!”
You didn’t use enough food coloring. The cocoa gives it a brown tint, so you need that pop of red to counteract it. Use the full 2 tablespoons of liquid or 1 teaspoon of gel. Don’t be shy.
“The frosting won’t stay on the cake!”
Your cream cheese or butter was too warm. Pop the frosting in the fridge for 15-20 minutes to firm it up. Also make sure your cake is completely cool before frosting.
“It sank in the middle!”
Three possible culprits:
- You opened the oven door too early (wait at least 25 minutes)
- Your oven runs cold (get an oven thermometer)
- You didn’t mix the batter enough
“The layers are uneven!”
Next time, use a kitchen scale to divide the batter equally. Or use a measuring cup to portion it out. Eyeballing works but it’s not as reliable.
“My frosting has lumps!”
Your cream cheese wasn’t soft enough. Microwave it for 10 seconds at a time until it’s really soft, then beat it again. Or push it through a fine-mesh sieve to remove lumps.
FAQ
Can I use Dutch-process cocoa?
No! Stick with regular unsweetened cocoa. Dutch-process is treated with alkali which messes with the acid-base reaction that helps this cake rise properly. Chemistry matters here.
How do I get smooth frosting on the sides?
Use an offset spatula held at a slight angle against the cake. Turn your cake stand while keeping the spatula steady. A bench scraper also works great. Practice makes perfect.
Can I make this without eggs?
You can substitute each egg with ¼ cup unsweetened applesauce or a flax egg (1 tablespoon ground flaxseed + 3 tablespoons water, let sit 5 minutes). The texture will be slightly different but it works.
Why does the recipe call for vinegar?
The vinegar reacts with the baking soda to help the cake rise and creates that tender crumb texture red velvet is known for. It also brings out the red color in the cocoa. Don’t skip it.
Can I use salted butter?
You can, but reduce the added salt in both the cake and frosting to ½ teaspoon each. Unsalted gives you more control over the final flavor.
How far in advance can I make this?
Bake the cakes up to 2 days ahead and keep them wrapped at room temperature. Or freeze them for up to 3 months. Frost the day you plan to serve for best results.
What if I don’t have buttermilk?
Mix 1 cup regular milk with 1 tablespoon white vinegar or lemon juice. Let it sit for 5 minutes and boom, you’ve got buttermilk. It works just as well.
Can I use this recipe for a sheet cake?
Absolutely! Pour it into a greased 9×13 pan and bake for 35-40 minutes. You’ll have enough frosting to cover it generously.
Wrapping Up
There’s something about a homemade red velvet cake that just hits different.
Maybe it’s the way that cream cheese frosting melts on your tongue. Or how the cake is soft but not too sweet. Or the fact that it looks absolutely stunning on any table.
You don’t need to be a professional baker to nail this. Just follow the steps, don’t rush the cooling process, and trust the recipe. The chemistry does most of the work for you.
Make this for your next celebration. Or just because it’s Tuesday and you deserve cake. Life’s too short to wait for special occasions.
Drop a comment below when you try it! I want to know if you went classic with the frosting or if you tried the chocolate cream cheese version. And if you have questions while you’re making it, ask away. I’m here for it.
Now go make some cake magic happen.