You know that bunch of bananas sitting on your counter right now?
The ones with those brown spots you keep avoiding?
They’re about to become your favorite dessert.
I’m not talking about banana bread. We’ve all made that. This is different.
This banana cake is soft, moist, and has this deep banana flavor that hits different from anything you’ve probably tried before. It’s the kind of cake that makes people ask for seconds before they’ve even finished their first slice.
And here’s the thing: you probably already have everything you need to make it.
No fancy ingredients. No complicated techniques. Just a really good cake that happens to use up those overripe bananas you were about to toss.
I’ve made this cake probably 50 times now, and it gets requested at every family gathering. My sister actually texted me last week asking if I could “please bring THAT cake again” to her birthday dinner.
So if you’re ready to turn those sad-looking bananas into something people will literally ask you to make on repeat, let’s get into it.
What You’ll Need
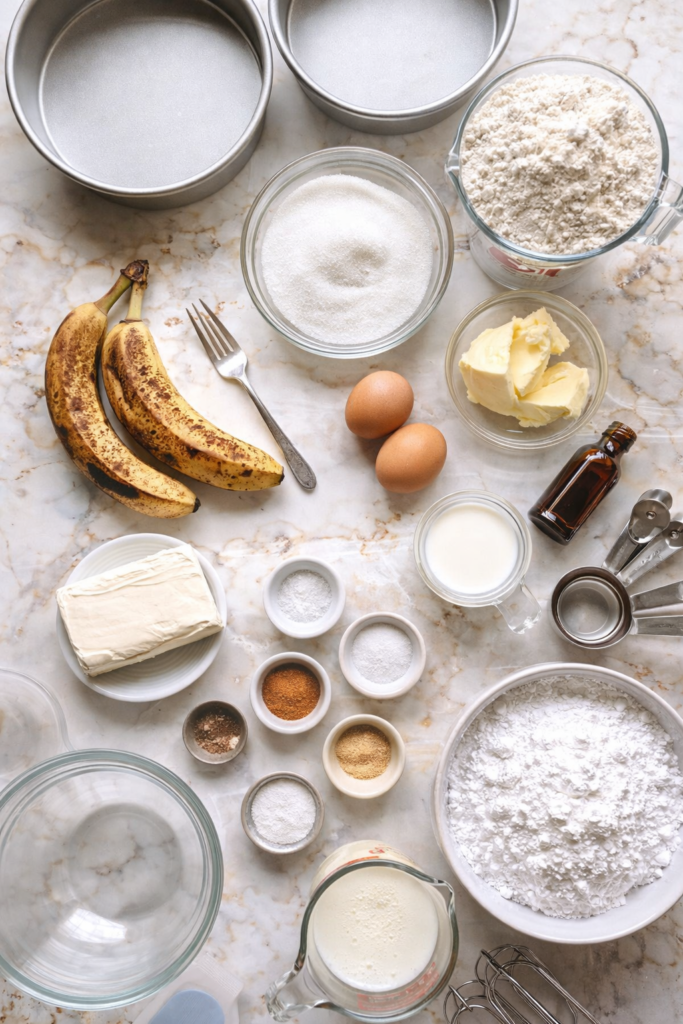
For the Cake
| Ingredient | Amount | Notes |
|---|---|---|
| Overripe bananas | 3 large | The browner, the better 🍌 |
| All-purpose flour | 2 cups | Spoon and level for accuracy |
| Granulated sugar | 1½ cups | White sugar works best |
| Unsalted butter | ½ cup | Must be softened |
| Large eggs | 2 | Room temperature |
| Vanilla extract | 1 tsp | Pure, not imitation |
| Baking soda | 1 tsp | Check expiration date |
| Baking powder | ½ tsp | Fresh is key |
| Salt | ½ tsp | Regular table salt |
| Buttermilk | ½ cup | Or use the hack below |
| Ground cinnamon | 1 tsp | Adds warmth |
For the Cream Cheese Frosting
| Ingredient | Amount | Notes |
|---|---|---|
| Cream cheese | 8 oz | Full-fat, softened |
| Unsalted butter | ¼ cup | Softened to room temp |
| Powdered sugar | 3 cups | Sifted if lumpy |
| Vanilla extract | 1 tsp | Good quality matters |
| Salt | Pinch | Balances sweetness |
Tools You’ll Need
You don’t need anything fancy for this one.
Essential:
- Two 9-inch round cake pans (or one 9×13)
- Electric mixer or stand mixer
- 2-3 mixing bowls
- Measuring cups and spoons
- Rubber spatula
Nice to Have:
- Wire cooling rack
- Fork or potato masher
- Parchment paper
- Kitchen scale
- Offset spatula for frosting
Pro Tips
Here’s what I’ve learned after making this cake way too many times:
1. Those Brown Bananas Are Your Secret Weapon
Don’t use yellow bananas for this. You want the ones that look like they’re past their prime with lots of brown spots or even fully brown peels.
They’re sweeter, easier to mash, and give you way more banana flavor.
If your bananas aren’t ripe enough, stick them in a paper bag for a day or two. Need them faster? Bake unpeeled bananas at 300°F for 15-20 minutes until the skins turn black.
2. Room Temperature Ingredients Make a Huge Difference
Cold butter and eggs won’t mix properly. Your cake will be denser and won’t rise as well.
Quick fix if you forgot:
- Eggs: Sit in warm water for 5 minutes
- Butter: Cut into small cubes, spreads to room temp faster
- Cream cheese: Microwave for 10 seconds (seriously, just 10)
3. Don’t Overmix the Batter
Once you add the flour, mix just until you can’t see any more white streaks.
Overmixing develops the gluten and makes your cake tough instead of tender. A few small lumps are totally fine.
Think of it like this: 30 seconds of overmixing = 30 minutes of regret.
4. The Toothpick Test Is Your Friend
| What You See | What It Means | What To Do |
|---|---|---|
| Wet batter on toothpick | Not done | Bake 5 more minutes |
| Moist crumbs | Perfect! | Take it out now |
| Completely clean | Overbaked | Next time, check earlier |
Start checking at 25 minutes. Oven temperatures vary like crazy.
5. Let It Cool Completely Before Frosting
I know waiting is painful when your kitchen smells this good.
But warm cake will melt your frosting into a soupy mess.
Give it at least an hour on the cooling rack. Trust me on this. 😅
How to Make It
Step 1: Prep Your Pans
Temperature check: 350°F
Grease your cake pans with butter or cooking spray, then line the bottoms with parchment paper.
This double protection means your cakes will actually come out of the pans without sticking.
Step 2: Mash Those Bananas
Peel your bananas and put them in a bowl.
Mash them with a fork until they’re mostly smooth. A few small chunks are fine and actually add nice texture to the cake.
Target: About 1½ cups of mashed banana
Step 3: Mix the Dry Stuff
In a medium bowl, whisk together:
- Flour
- Baking soda
- Baking powder
- Salt
- Cinnamon
Set this aside. Easy.
Step 4: Cream the Butter and Sugar
In a large bowl, beat the softened butter and sugar together with your mixer on medium speed.
Do this for about 3 minutes until it’s light and fluffy.
This step adds air to your cake and makes it super soft. Don’t skip it or rush it.
Step 5: Add Eggs and Vanilla
Add your eggs one at a time, beating well after each one.
Then mix in the vanilla extract.
The mixture might look a little curdled right now but don’t worry about it. It’ll all come together.
Step 6: Fold in the Bananas
Add your mashed bananas to the butter mixture and mix on low speed just until combined.
The batter will look a bit lumpy and that’s exactly what you want.
Step 7: Alternate the Dry and Wet
This is where it gets a little fancy but it’s worth it.
The pattern:
- Add ⅓ of flour mixture → mix on low
- Add ½ of buttermilk → mix
- Add ⅓ of flour mixture → mix
- Add remaining buttermilk → mix
- Add final ⅓ of flour mixture → mix
Stop mixing as soon as you don’t see dry flour anymore.
Step 8: Bake It
Divide the batter evenly between your two prepared pans.
If you have a kitchen scale, each pan should have about the same weight of batter. Smooth the tops with your spatula.
Bake for 28-32 minutes
| Time | What’s Happening |
|---|---|
| 0-10 min | Batter starts to set |
| 10-20 min | Cake rises and develops structure |
| 20-28 min | Top browns, inside finishes cooking |
| 28+ min | Danger zone – check with toothpick! |
The cakes are done when a toothpick inserted in the center comes out with just a few crumbs and the tops spring back when you gently press them.
Step 9: Cool Down
Let the cakes cool in the pans for 10 minutes.
Then turn them out onto a wire rack, peel off the parchment paper, and let them cool completely.
This usually takes about an hour. Go watch an episode of something. You’ve earned it.
Step 10: Make the Frosting
Beat the softened cream cheese and butter together until smooth and creamy. This takes about 2 minutes.
Add the powdered sugar one cup at a time, mixing on low speed.
Once it’s all incorporated, add the vanilla and salt, then beat on medium-high for another minute until it’s light and fluffy.
Texture check: Should be spreadable but hold its shape
Step 11: Frost and Serve
Place one cake layer on your serving plate.
Spread about a third of the frosting on top. Place the second layer on top and use the remaining frosting to cover the top and sides.
You can keep it rustic or smooth it out with a spatula. Both look great.
If you made a sheet cake, just spread all the frosting on top. Done.
Slice it up and watch it disappear. 🍰
Substitutions and Variations
Dietary Swaps
| Original | Swap | Result |
|---|---|---|
| Buttermilk | Almond milk + 1 tbsp lemon juice | Nearly identical |
| All-purpose flour | Half whole wheat | Healthier, nuttier |
| White sugar | Coconut sugar | Darker, molasses notes |
| Butter | Coconut oil | Slight coconut flavor |
| Eggs | Flax eggs (1 tbsp flax + 3 tbsp water each) | Slightly denser |
Fun Add-Ins
Want to make it even better?
Nuts: Fold in ½ cup chopped walnuts or pecans Chocolate: Add ½ cup chocolate chips (game changer) Tropical vibes: Mix in ¼ cup shredded coconut Extra spice: Add ½ tsp nutmeg with the cinnamon
Frosting Alternatives
Not feeling cream cheese frosting?
- Chocolate ganache for the chocolate lovers
- Brown butter frosting for something nutty
- Whipped cream if you want it lighter
- Salted caramel buttercream for next-level indulgence
- Nothing – it’s honestly delicious plain
Make Ahead Tips
This cake actually gets better the next day once all the flavors have time to settle in.
Timeline Options
| When | What To Do | Storage Method |
|---|---|---|
| 2 days ahead | Bake cake layers | Wrap tightly, room temp |
| 3 days ahead | Make frosting | Airtight container, fridge |
| 1 month ahead | Bake unfrosted layers | Wrap well, freeze |
| 2 months ahead | Bake and frost | Freeze uncovered 1 hr, then wrap |
Day-of assembly: Let frozen cakes thaw overnight in fridge. Bring frosting to room temp and re-whip before using.
Quick Reference Guide
Timing Breakdown
| Task | Time Needed |
|---|---|
| Prep ingredients | 10 minutes |
| Mix batter | 15 minutes |
| Bake cakes | 30 minutes |
| Cool completely | 60 minutes |
| Make frosting | 10 minutes |
| Frost cake | 15 minutes |
| TOTAL | 2 hours 20 minutes |
Active time: About 50 minutes Passive time: About 90 minutes (mostly cooling)
Nutrition Information
Per slice (1/12 of cake):
| Nutrient | Amount | % Daily Value |
|---|---|---|
| Calories | 425 | – |
| Total Fat | 16g | 21% |
| Saturated Fat | 10g | 50% |
| Cholesterol | 75mg | 25% |
| Sodium | 285mg | 12% |
| Carbohydrates | 68g | 23% |
| Fiber | 1g | 4% |
| Sugars | 52g | – |
| Protein | 4g | 8% |
Keep in mind this is cake, not a salad. It’s meant to be enjoyed, not stressed over. 😊
Perfect Pairings
This cake is pretty great on its own, but here are some ways to level it up:
Morning glory: ☕ Strong black coffee ☕ Cappuccino ☕ Chai latte
Dessert mode: 🍨 Vanilla ice cream (let it melt into the cake) 🍓 Fresh berries on top 🍯 Salted caramel drizzle 🥛 Cold glass of milk
Party status: 🍷 Sweet dessert wine 🥂 Champagne (fancy!) ☕ Espresso shots
Leftovers and Storage
If you somehow have leftovers (this rarely happens at my house), here’s how to keep them fresh.
Storage Options Compared
| Method | Duration | Best For | Pro Tip |
|---|---|---|---|
| Room temp | 2 days | Quick eating | Use cake dome |
| Refrigerator | 5 days | Cream cheese frosting | Let warm to room temp before serving |
| Freezer (slices) | 3 months | Grab-and-go portions | Wrap individually in plastic wrap |
| Freezer (whole) | 3 months | Long-term storage | Freeze uncovered first, then wrap |
Individual slices: Wrap each slice in plastic wrap and store in an airtight container. They’re perfect for grabbing a quick piece whenever you want.
The cake actually freezes really well too. Just thaw at room temperature for about an hour.
Troubleshooting Guide
Common Problems and Fixes
| Problem | Likely Cause | Solution |
|---|---|---|
| Cake is dense | Overmixed batter | Mix just until combined next time |
| Cake didn’t rise | Old leavening agents | Replace baking soda/powder |
| Stuck to pan | Insufficient greasing | Grease + parchment paper |
| Dry texture | Overbaked | Check 5 min earlier next time |
| Frosting too runny | Ingredients too warm | Chill 15 min, then re-whip |
| Uneven baking | Hot spots in oven | Rotate pans halfway through |
FAQ
Why is my cake dense?
Usually this happens from overmixing the batter once you add the flour. Mix just until the flour disappears and no more.
Also make sure your baking soda and baking powder aren’t expired. They lose their power over time.
Can I use frozen bananas?
Absolutely! Just thaw them completely and drain any excess liquid before mashing.
Frozen bananas actually work great because they break down easily. Sometimes I freeze bananas on purpose for this recipe.
My cake stuck to the pan. What happened?
This is why greasing AND using parchment paper is so important.
Make sure you’re doing both. Also, let the cake cool in the pan for the full 10 minutes before trying to remove it.
Can I make this as cupcakes?
Yes! Line a muffin tin with cupcake liners and fill each about two-thirds full.
Bake at 350°F for 18-22 minutes. This recipe makes about 24 cupcakes.
The frosting is too soft. Help!
Pop it in the fridge for 15-20 minutes to firm up.
If it’s too stiff, let it sit at room temperature for a bit and give it another whip.
Can I skip the cinnamon?
Sure, but it adds a nice warmth that really complements the banana.
If you’re not a fan, try nutmeg instead or just leave it out. The cake will still be delicious.
How ripe should the bananas be?
You want them covered in brown spots or even completely brown.
The riper they are, the sweeter and more flavorful your cake will be.
Don’t use green or barely yellow bananas. They won’t mash well and won’t have enough flavor.
Can I make this without eggs?
Replace each egg with a “flax egg” (1 tablespoon ground flaxseed mixed with 3 tablespoons water, let sit 5 minutes).
The texture will be slightly different but it still works. I’ve done it for my vegan friends and they loved it.
Do I have to use cream cheese frosting?
Nope! This cake is delicious with any frosting you like, or even just a dusting of powdered sugar.
Try it with chocolate frosting if you’re feeling adventurous.
Can I halve this recipe?
You can, but I wouldn’t recommend it. The cake keeps so well that you might as well make the full batch.
Plus, once people try it, you’ll wish you made more anyway.
Wrapping Up
So there you have it.
A banana cake that’s about to become your new favorite way to use up those brown bananas.
It’s simple enough for a random Tuesday night but special enough that people will think you spent hours on it. And the cream cheese frosting? That’s what keeps people coming back for more.
The cool thing about this recipe is that once you make it a few times, you’ll probably start tweaking it to make it your own.
Maybe you’ll add chocolate chips. Maybe you’ll swap the frosting for something else. Maybe you’ll turn it into cupcakes for your kid’s class party.
That’s the fun part.
Give it a try this week and see what happens. And when someone inevitably asks you for the recipe, just send them here.
Drop a comment below and let me know how yours turned out. Did you make any changes? What did you serve it with?
I love hearing about how people make this recipe their own.
Happy baking! 🎂