
I used to order lemon chicken from our local Chinese restaurant at least twice a month.
Then one night, they forgot my order.
I was starving, irritated, and staring at a fridge full of random ingredients. So I decided to just make it myself.
Here’s the kicker: it was better than takeout. Way better.
The chicken came out perfectly golden and crispy. The sauce was tangy, sweet, and glossy in a way that made me want to lick the plate (and I did, when no one was looking).
The whole thing took less time than waiting for delivery.
Now I make this at least once a week, and my husband literally requests it for his birthday dinner.
That’s how good it is.
What You’ll Need
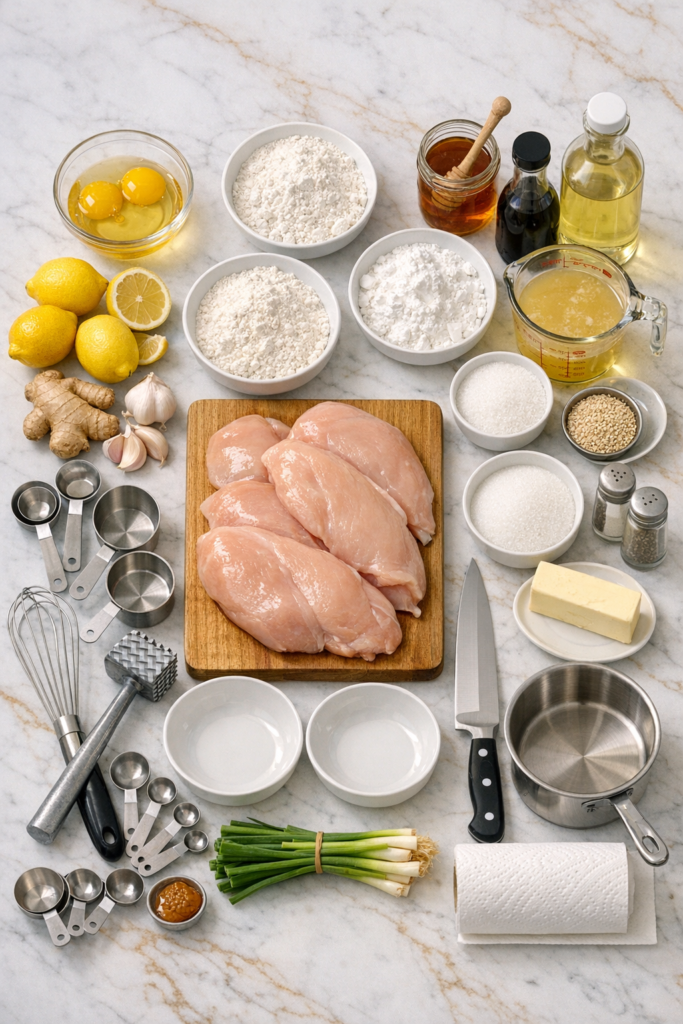
For the Chicken
| Ingredient | Amount | Notes |
|---|---|---|
| Boneless, skinless chicken breasts | 1.5 lbs | Or thighs for juicier meat |
| All-purpose flour | 1/2 cup | For first coating |
| Cornstarch | 1/2 cup | Makes it extra crispy |
| Eggs | 2 large | Beaten well |
| Salt | 1 tsp | |
| Black pepper | 1/2 tsp | Freshly ground is best |
| Garlic powder | 1/2 tsp | |
| Vegetable oil | 2 cups | For frying |
For the Lemon Sauce
| Ingredient | Amount | Why It Matters |
|---|---|---|
| Fresh lemon juice | 1/2 cup | About 3-4 lemons, DON’T use bottled |
| Lemon zest | From 2 lemons | This is where the flavor lives |
| Chicken broth | 1/2 cup | Adds depth |
| Granulated sugar | 1/3 cup | Balances the tartness |
| Honey | 2 tbsp | Natural sweetness |
| Soy sauce | 2 tbsp | Umami bomb |
| Garlic | 3 cloves, minced | Fresh only |
| Fresh ginger | 1 tbsp, grated | Game changer |
| Cornstarch slurry | 2 tbsp + 2 tbsp water | For that glossy thickness |
| Butter | 1 tbsp | Final touch of richness |
For Garnish
- Sesame seeds
- Sliced green onions
- Lemon slices
Tools You’ll Need
Essential:
- Large skillet or wok
- Medium saucepan
- Three shallow bowls
- Tongs
- Whisk
Also Helpful:
- Meat mallet (trust me on this)
- Paper towels
- Measuring cups and spoons
Pro Tips
Chef’s Secret: The difference between good lemon chicken and GREAT lemon chicken is all in the prep and timing. These five tips will change everything.
Tip #1: Pound Your Chicken Flat
This is non-negotiable.
If your chicken breasts are thick and uneven, they’ll cook unevenly. Some parts will be dry while others are still raw.
Use a meat mallet or even a rolling pin to pound them to about 1/2 inch thickness.
Game changer.
Tip #2: Let the Coating Sit for 5 Minutes
After you bread your chicken, let it sit on a plate for about 5 minutes before frying.
This helps the coating stick better so it doesn’t fall off in the oil.
I learned this the hard way after fishing out chunks of breading from my oil.
Tip #3: Don’t Crowd the Pan
I know you want to cook everything at once, but resist.
If you put too many pieces in at the same time, the oil temperature drops and your chicken gets soggy instead of crispy.
Cook in batches. Trust me.
Tip #4: Make the Sauce While the Chicken Rests
Your chicken needs to rest for a few minutes after frying anyway, so use that time to whip up the sauce.
It comes together in about 5 minutes and you’ll have everything ready at the same time.
Tip #5: Taste Your Sauce Before Tossing
Everyone’s lemon juice is different.
Some lemons are super tart, some are milder.
Taste your sauce and adjust the sugar or honey if it’s too sour, or add more lemon juice if it’s too sweet.
You want that perfect sweet-tart balance.
Substitutions and Variations
| Instead of This | Try This | Result |
|---|---|---|
| Chicken breasts | Chicken thighs | Juicier, harder to overcook |
| All-purpose flour | Rice flour or GF blend | Gluten-free version |
| Deep frying | Baking at 425°F | Lighter, still delicious |
| Plain sauce | Add 1/2 tsp red pepper flakes | Spicy kick |
| All lemon juice | Half lemon, half orange juice | Sweeter citrus flavor |
| Honey | Maple syrup | Different but delicious |
The “I Want It Healthier” Version
Skip the frying completely.
Bake the breaded chicken at 425°F for 20-25 minutes, flipping halfway.
It won’t be quite as crispy, but it’s still delicious and way healthier.
You’ll cut about 100 calories and significantly reduce the fat.
The “I Like It Spicy” Version
Add 1/2 tsp red pepper flakes or a sliced Thai chili to the sauce.
The heat plays really nicely with the lemon.
Your mouth will thank you.
Make Ahead Tips
24 Hours Before:
- Cut chicken into pieces
- Pound it flat
- Store in airtight container in fridge
3 Days Before:
- Make the entire sauce
- Store in jar in fridge
- Reheat gently when ready
1 Hour Before:
- Set up breading stations
- Don’t do it earlier (eggs get weird)
3 Months Before:
- Bread the chicken
- Freeze in single layer
- Cook straight from frozen (add 5 minutes)
Time-Saver Alert: The sauce freezes beautifully. Make a double batch and freeze half for next time. Future you will be grateful.
How to Make Lemon Chicken
Step 1: Prep Your Chicken
Pat the chicken breasts completely dry with paper towels.
This is important because wet chicken won’t get crispy.
Cut them into bite-sized pieces, about 1.5 inches each.
If they’re thick, pound them down a bit so they’re all roughly the same thickness.
Step 2: Set Up Your Breading Station
Bowl 1: Flour + salt + pepper + garlic powder
Bowl 2: Beaten eggs
Bowl 3: Cornstarch
Line them up in that order. This is your assembly line.
Step 3: Bread the Chicken
Here’s the process for each piece:
- Coat in flour mixture → shake off excess
- Dip in egg → let extra drip off
- Roll in cornstarch → complete coverage
- Place on plate
Repeat with all pieces.
Then stop. Let them sit for 5 minutes.
Go check your phone, put on some music, whatever. Just let them sit.
Step 4: Fry the Chicken
Heat about 2 inches of oil in your large skillet over medium-high heat.
You want it around 350°F.
No Thermometer? Drop a small piece of bread in. If it sizzles immediately and turns golden in about 60 seconds, you’re good.
Working in batches, carefully add your chicken pieces.
Don’t overcrowd.
Fry for 3-4 minutes per side until they’re golden brown and cooked through.
Transfer to your paper towel-lined plate to drain.
Step 5: Make the Sauce
While your chicken rests, make the sauce.
In a medium saucepan, combine:
- Lemon juice
- Lemon zest
- Chicken broth
- Sugar
- Honey
- Soy sauce
- Garlic
- Ginger
Bring it to a simmer over medium heat, stirring occasionally.
Once it’s simmering, add your cornstarch slurry.
Stir it constantly.
The sauce will thicken in about 2-3 minutes. You want it to coat the back of a spoon.
Remove from heat and stir in the butter.
This gives it a beautiful glossy finish.
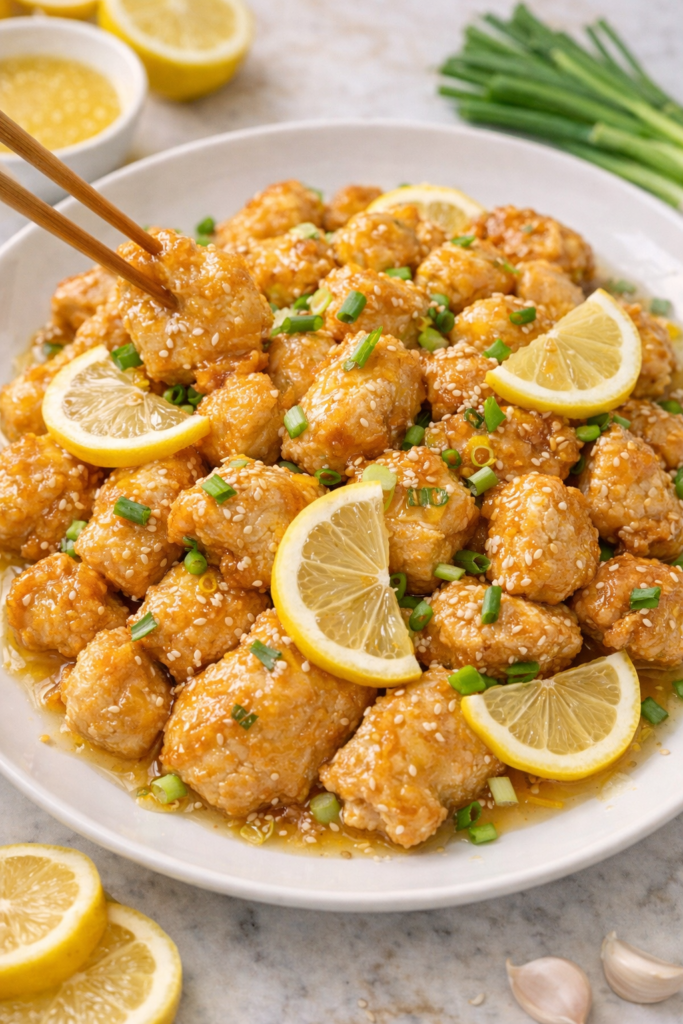
Step 6: Combine and Serve
If you’re serving immediately, toss the chicken pieces in the sauce until they’re completely coated.
Transfer to a serving plate.
Sprinkle with sesame seeds, green onions, and add a few lemon slices for garnish.
Serve right away while the chicken is still crispy.
Quick Reference: Cooking Times
| Task | Time |
|---|---|
| Prep chicken | 10 min |
| Set up breading station | 5 min |
| Bread all chicken | 5 min |
| Fry (in batches) | 15 min |
| Make sauce | 5 min |
| Toss and serve | 5 min |
| TOTAL | 45 min |
Nutritional Breakdown
Per Serving (serves 4)
| Nutrient | Amount | % Daily Value |
|---|---|---|
| Calories | 485 | – |
| Protein | 38g | 76% |
| Carbohydrates | 52g | 17% |
| Fat | 14g | 18% |
| Saturated Fat | 3g | 15% |
| Fiber | 1g | 4% |
| Sugar | 22g | – |
| Sodium | 780mg | 34% |
| Vitamin C | – | 35% |
Baked Version: Cuts calories by about 100 and significantly reduces fat content while keeping all the flavor.
What to Serve With Lemon Chicken
The Classic Combo:
| Side Dish | Why It Works |
|---|---|
| White jasmine rice | Soaks up the amazing sauce |
| Steamed broccoli | Adds green, balances richness |
| Fried rice | Full takeout-style experience |
| Asian cucumber salad | Cool, refreshing crunch |
| Stir-fried bok choy | Light but flavorful |
My personal favorite? Jasmine rice + steamed broccoli.
Simple, lets the chicken shine, and you get a complete meal.
Leftovers and Storage
The Right Way to Store
Chicken: Separate from sauce if possible, airtight container, fridge for up to 3 days
Sauce: Jar in fridge for up to 5 days
The Right Way to Reheat
Put chicken pieces on a baking sheet in a 350°F oven for about 10 minutes.
This helps them get crispy again.
Don’t microwave the chicken. It makes it soggy.
Heat the sauce separately on the stovetop or in the microwave, then toss with the reheated chicken.
Can You Freeze It?
Chicken: Yes, up to 3 months, but texture changes a bit
Sauce: Freezes beautifully, thaw overnight in fridge
Real Talk: The sauce freezes way better than the chicken. If you’re meal prepping, freeze just the sauce and make fresh chicken when you want it.
FAQ
Q: Can I use chicken thighs instead of breasts?
Absolutely. Thighs are actually more forgiving because they’re fattier and stay juicier. Just adjust the cooking time slightly since they might take an extra minute or two.
Q: Why is my coating falling off?
This usually happens if the chicken is too wet when you start breading, or if you don’t let the breaded chicken rest before frying. Pat that chicken super dry and give it those 5 minutes to set.
Q: Can I make this in an air fryer?
Yes! Spray the breaded chicken with cooking spray and air fry at 400°F for 12-15 minutes, flipping halfway through. It won’t be quite as crispy as deep frying but it’s still really good.
Q: My sauce is too thick. Help!
Just add a tablespoon of water or chicken broth at a time until it reaches the consistency you want. Whisk it well as you add liquid.
Q: My sauce is too thin. What do I do?
Mix another teaspoon of cornstarch with a teaspoon of water and add it to the simmering sauce. Give it a minute to thicken up.
Q: Can I use bottled lemon juice?
You can, but please don’t. Fresh lemon juice makes such a huge difference in flavor. It’s bright and vibrant in a way that bottled juice just isn’t. Spend the extra two minutes juicing real lemons.
Q: How do I know when the chicken is cooked through?
The internal temperature should reach 165°F. If you don’t have a meat thermometer, cut into the thickest piece. The juices should run clear and there shouldn’t be any pink.
Q: Can I make this ahead for meal prep?
Kind of. The chicken loses its crispiness after a day in the fridge, so it’s not ideal for meal prep if texture matters to you. But the flavor is still great. Just reheat in the oven to crisp it back up a bit.
Q: What if I don’t have fresh ginger?
You can use 1/2 tsp ground ginger instead. It’s not quite the same, but it’ll work in a pinch. Or just leave it out entirely. The garlic and lemon are the real stars anyway.
Common Mistakes to Avoid
| Mistake | Why It’s Bad | How to Fix It |
|---|---|---|
| Not drying chicken | Coating slides off | Pat completely dry with paper towels |
| Crowding the pan | Oil temp drops, soggy chicken | Cook in small batches |
| Using bottled lemon juice | Flat, artificial flavor | Always use fresh lemons |
| Skipping the rest time | Coating doesn’t stick | Wait 5 minutes after breading |
| Microwaving leftovers | Soggy, rubbery texture | Reheat in oven at 350°F |
Why This Recipe Works
Here’s the science behind why this is so good:
The double coating (flour then cornstarch) creates an incredibly crispy exterior that stays crunchy even under sauce.
The egg wash acts like glue, binding everything together so your coating doesn’t fall off.
Fresh lemon juice and zest deliver bright, authentic citrus flavor that bottled juice can’t match.
The cornstarch slurry in the sauce creates that glossy, restaurant-quality texture that clings to every piece of chicken.
The butter finish adds richness and gives the sauce a professional sheen.
It’s not complicated. It’s just smart technique.
Wrapping Up
Listen, I get it. Making fried chicken at home sounds like a hassle.
But this recipe is so worth it.
The chicken comes out perfectly crispy, the sauce is absolutely addictive, and you’ll feel like a kitchen rockstar when you plate it up.
Plus, you know exactly what’s going into your food. No weird preservatives or mystery ingredients.
Just real, fresh flavors.
The first time I served this to friends, they literally asked if I’d ordered it from somewhere.
When I told them I made it, they demanded the recipe immediately.
So go make this. Tonight, this weekend, whenever.
Just make it.
And when you do, come back here and drop a comment.
Tell me what you thought. Did you add your own twist? Did your family lose their minds over it?
I want to hear everything.
Now go turn on some music, get your ingredients ready, and let’s make some seriously good lemon chicken. 🍋