
You know that feeling when you bite into something and you just stop?
Like, fork down, eyes closed, involuntary “mmm” kind of stop?
That’s what this lemon loaf does.
It’s bright, buttery, dense in all the right ways, and finished with a lemon glaze that soaks right into the top. It tastes like a bakery made it, but you’ll be shocked at how simple the process actually is.
And no, you don’t need any fancy equipment or a culinary degree. Just a bowl, a loaf pan, and about an hour of your time.
What You’ll Need
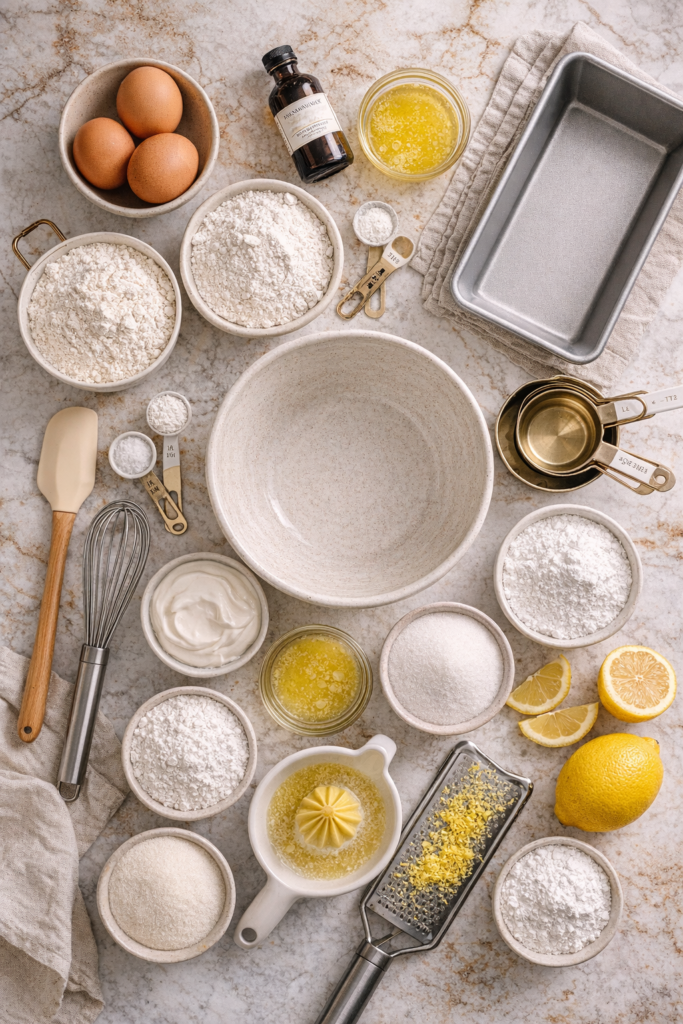
For the Loaf
- 1 ½ cups (190g) all-purpose flour
- 1 tsp baking powder
- ½ tsp salt
- 3 large eggs, room temperature
- 1 cup (200g) granulated sugar
- 1 cup (240ml) sour cream, room temperature
- ½ cup (115g) unsalted butter, melted and cooled
- 2 tbsp fresh lemon zest (about 2 large lemons)
- 2 tbsp fresh lemon juice
- 1 tsp pure vanilla extract
For the Lemon Glaze
- 1 cup (120g) powdered sugar, sifted
- 2–3 tbsp fresh lemon juice
- 1 tsp lemon zest (optional, but worth it)
Tools You’ll Need
- 9×5 inch loaf pan
- Large mixing bowl
- Medium mixing bowl
- Whisk
- Rubber spatula
- Microplane or fine grater (for zesting)
- Citrus juicer
- Parchment paper
- Wire cooling rack
- Measuring cups and spoons
Pro Tips
These are the things that actually make a difference:
- Room temperature ingredients matter more than you think. Cold eggs or sour cream can cause the batter to curdle or bake unevenly. Pull everything out 30–45 minutes before you start.
- Zest before you juice. Always. Once you’ve cut and squeezed a lemon, zesting it becomes a frustrating, slippery mess. Zest first, then juice.
- Don’t overmix. Once the flour goes in, mix just until combined. Overworked batter = dense, tough loaf. Stop when you see the last streak of flour disappear.
- Poke holes in the top before adding the glaze. Use a toothpick or skewer to poke small holes across the top of the warm loaf. The glaze seeps in instead of just sitting on top. Game changer.
- Let it cool at least 20 minutes before glazing. If the loaf is too hot, the glaze will slide right off and pool at the bottom of the pan. Patience here is worth it.
Substitutions & Variations
Not everyone has the same pantry, and that’s fine.
| Ingredient | Substitution |
|---|---|
| Sour cream | Full-fat plain Greek yogurt (1:1 swap) |
| Unsalted butter | Neutral oil like avocado or vegetable oil |
| All-purpose flour | 1:1 gluten-free flour blend |
| Granulated sugar | Coconut sugar (slightly less sweet, earthier flavor) |
| Fresh lemon juice | Bottled lemon juice works in a pinch, but fresh is miles better |
Variations to try:
- Lemon blueberry loaf – Fold in 1 cup of fresh blueberries tossed in 1 tbsp flour before adding to the pan
- Lemon poppy seed loaf – Stir in 2 tbsp poppy seeds with the dry ingredients
- Lemon lavender glaze – Add ½ tsp dried culinary lavender to your warm glaze and strain before pouring
Make-Ahead Tips
This loaf actually gets better the next day.
The lemon flavor deepens, the crumb settles, and the glaze firms up beautifully.
To make ahead:
- Bake the loaf, let it cool completely, then wrap tightly in plastic wrap (unglazed). Store at room temperature for up to 2 days.
- Add the glaze the morning you plan to serve it.
- You can also prep your dry and wet ingredients separately the night before and combine them fresh the next morning.
How to Make It

Step 1: Prep Your Pan and Oven
Preheat your oven to 350°F (175°C).
Grease your loaf pan with butter or non-stick spray, then line it with parchment paper, leaving some hanging over the sides. This makes lifting the loaf out so much easier.
Step 2: Mix the Dry Ingredients
In a medium bowl, whisk together the flour, baking powder, and salt. Set aside.
Step 3: Mix the Wet Ingredients
In a large bowl, whisk together the eggs and granulated sugar until pale and slightly thickened, about 1–2 minutes.
Add the sour cream, melted butter, lemon zest, lemon juice, and vanilla. Whisk until smooth and combined.
Step 4: Combine
Pour the dry ingredients into the wet ingredients.
Using a rubber spatula, fold gently until just combined. A few small lumps are totally fine. Do not keep stirring.
Step 5: Bake
Pour the batter into your prepared loaf pan and smooth the top.
Bake for 50–60 minutes, or until a toothpick inserted into the center comes out clean. If the top starts browning too fast around the 40-minute mark, loosely tent it with foil.
Step 6: Make the Glaze
While the loaf cools, whisk together the powdered sugar, lemon juice, and zest until smooth and pourable.
You want it thick enough to coat the back of a spoon but still liquid enough to pour. Add lemon juice a little at a time until you hit that consistency.
Step 7: Glaze the Loaf
Once the loaf has cooled for at least 20 minutes (it should still be slightly warm, not hot), poke small holes across the top with a toothpick.
Pour the glaze slowly and evenly over the top, letting it run down the sides a little.
Let it set for another 10–15 minutes before slicing.
Nutritional Breakdown
Per slice (based on 10 slices)
| Nutrient | Amount |
|---|---|
| Calories | ~290 kcal |
| Carbohydrates | 42g |
| Fat | 12g |
| Protein | 4g |
| Sugar | 28g |
| Sodium | 160mg |
Dietary notes:
- Dairy-free? Swap butter for melted coconut oil and sour cream for a dairy-free yogurt alternative.
- Lower sugar? Reduce granulated sugar to ¾ cup and use a light powdered sugar glaze.
- Higher protein? Substitute ¼ cup of flour with vanilla protein powder.
Pairs well with: a cup of Earl Grey tea, fresh berries on the side, or a scoop of vanilla ice cream if you’re really committing to the moment.
Leftovers & Storage
This loaf keeps really well.
Room temperature: Wrap in plastic wrap or store in an airtight container. Stays fresh for up to 3 days.
Refrigerator: Store in an airtight container for up to 5 days. Bring to room temperature before serving or give it 10 seconds in the microwave.
Freezer: Slice the loaf before freezing, wrap individual slices in plastic wrap, and store in a zip-lock bag for up to 3 months. Thaw at room temperature or microwave for 20–30 seconds.
Pro tip: Do not add the glaze before freezing. Freeze the loaf plain and glaze fresh after thawing.
FAQ
Can I use bottled lemon juice instead of fresh?
You can, but the flavor won’t be as bright or punchy. Fresh lemon zest carries a lot of the flavor here, and bottled juice just doesn’t have the same depth. If you only have bottled, it’ll still work, just not quite as good.
Why did my loaf sink in the middle?
A few possible reasons: the oven wasn’t fully preheated, the batter was overmixed, or the loaf was pulled out too early. Always do the toothpick test in the very center before taking it out.
Can I make this into muffins?
Absolutely. Pour the batter into a greased muffin tin and bake at 350°F for 18–22 minutes. This recipe makes about 12 muffins.
My glaze turned out too thick. What do I do?
Add fresh lemon juice, one teaspoon at a time, and whisk until you reach the right consistency.
Can I double the recipe?
Yes! Use two loaf pans or one large Bundt pan. Baking time for the Bundt pan will increase to around 60–70 minutes.
Do I have to use sour cream?
Not at all. Full-fat Greek yogurt is the closest swap and works beautifully. The sour cream gives the loaf its super moist, tender crumb, so you want something with a similar fat content.
Wrapping Up
This lemon loaf is one of those recipes you make once and then suddenly it’s in permanent rotation.
It’s not fussy. It doesn’t require anything unusual. But the result is genuinely impressive every single time 🍋
Once you try the glazed version with the holes poked in the top, you won’t go back to any other method.
Give it a go this week and drop a comment below with how it turned out! Did you try any of the variations? Add blueberries? Swap in yogurt? Tell me everything. And if you have questions before you start baking, leave those too. I love hearing from you.