You know that smell when you walk past a bakery and your stomach immediately grumbles?
That’s what your kitchen will smell like when you make this sandwich bread from scratch. And I’m not talking about some dense, rock-hard loaf that’s only good for doorstops.
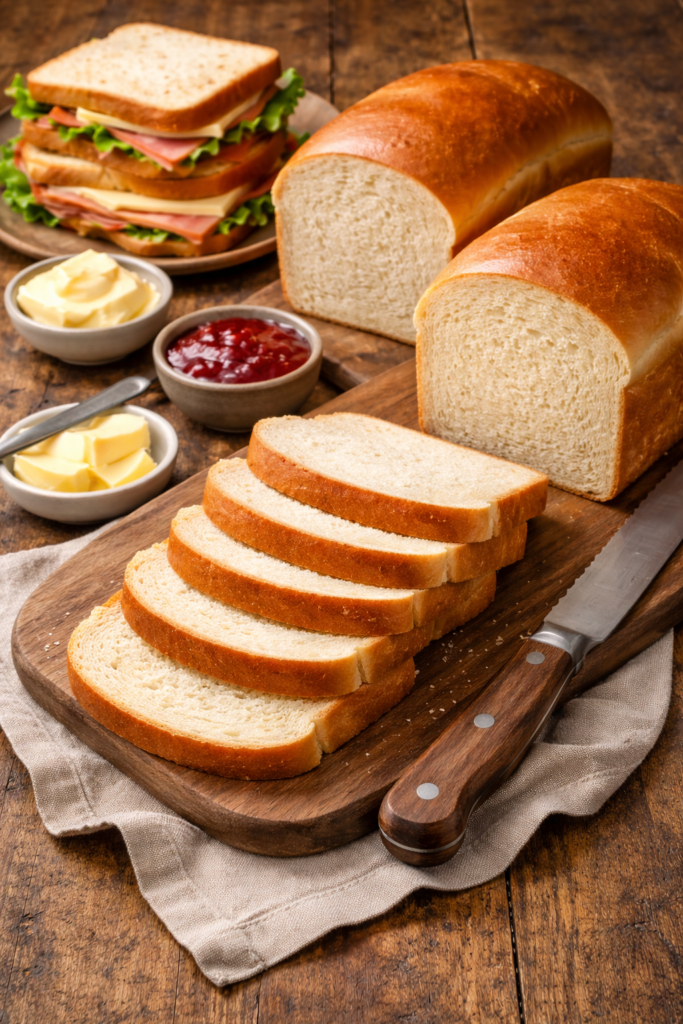
This is the soft, fluffy, pull-apart-in-layers kind of bread that makes store-bought stuff taste like cardboard in comparison.
I’ll be honest with you – I avoided making homemade bread for years. It seemed like something only people with sourdough starters and fancy stand mixers could pull off. But then I tried this recipe on a random Tuesday afternoon, and now I can’t go back to buying bread at the grocery store.
The crust gets this perfect golden color, the inside stays soft for days (if it lasts that long), and it slices beautifully without crumbling everywhere. Plus, you know exactly what’s going into it. No weird preservatives or ingredients you can’t pronounce.
This recipe makes two loaves, which is perfect for meal prepping or sharing one with a neighbor who’ll think you’re some kind of baking wizard.
What You’ll Need
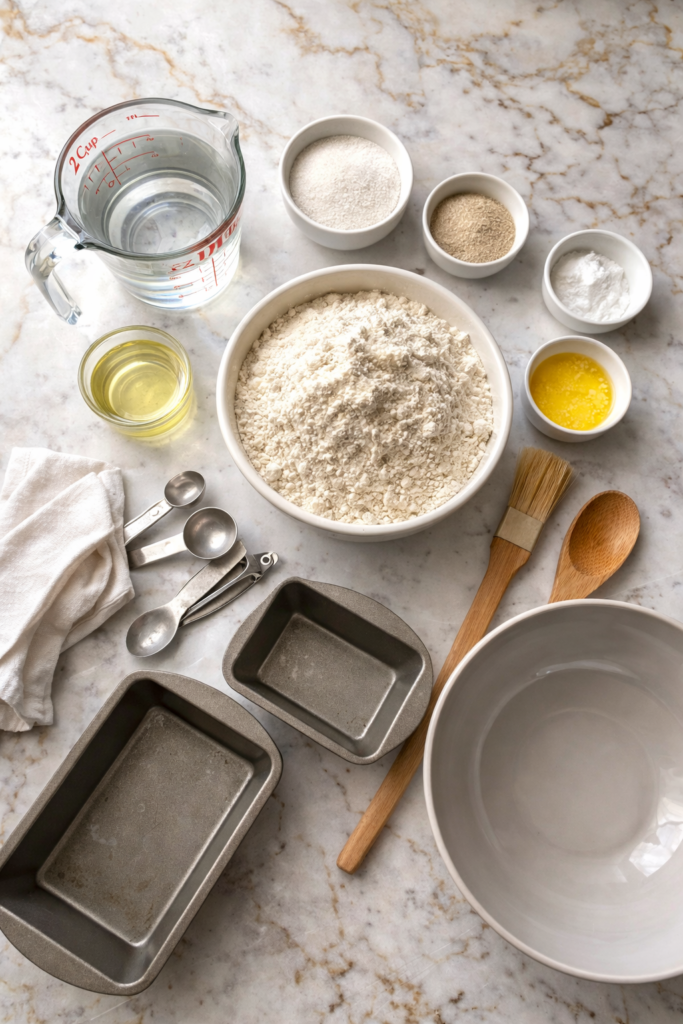
For the Dough:
- 2 cups warm water (110°F/43°C)
- 2/3 cup white sugar
- 1 1/2 tablespoons active dry yeast
- 1 1/2 teaspoons salt
- 1/4 cup vegetable oil
- 6 cups bread flour (or all-purpose flour)
For Finishing:
- 2 tablespoons butter, melted (for brushing)
That’s it. Seven ingredients total, and you probably have most of them in your pantry right now.
Tools You’ll Need
You don’t need a fancy kitchen to make this bread. Here’s what you’ll actually use:
- 2 standard 9×5 inch loaf pans
- Large mixing bowl
- Measuring cups and spoons
- Wooden spoon or sturdy spatula
- Clean kitchen towel
- Pastry brush (or just use a folded paper towel)
- Cooling rack
If you have a stand mixer with a dough hook, great. If not, your hands work just fine. I’ve made this both ways and honestly can’t tell the difference in the final result.
Pro Tips
Temperature matters more than you think. Your water should feel like a warm bath – not hot enough to hurt, but definitely warm. Too hot and you’ll kill the yeast. Too cold and it won’t activate properly. I test it on my wrist like you would baby formula.
Don’t skip the rising time. I know it’s tempting to rush this part, but the yeast needs time to do its thing. Find a warm spot in your kitchen. I usually turn my oven on for 60 seconds, turn it off, and let the dough rise in there. Works like a charm.
The dough should be slightly sticky. If your dough is completely dry, you’ve added too much flour. It should stick to your fingers just a bit when you touch it. This is what creates that soft, pillowy texture.
Test your yeast before committing. If your yeast doesn’t foam up after 5-10 minutes in the warm water and sugar mixture, it’s dead. Toss it and start over with fresh yeast. Trust me, I learned this the hard way.
Use bread flour if you can find it. All-purpose works fine, but bread flour has more protein, which means better structure and that perfect chewy texture. You’ll notice the difference.
How to Make Sandwich Bread
Step 1: Wake up the yeast
Pour your warm water into a large bowl and stir in the sugar. Sprinkle the yeast on top and let it sit for 5-10 minutes. You’ll know it’s working when it gets foamy and bubbly on top. It should smell kind of yeasty and beer-like.
Step 2: Mix the dough
Add the salt and oil to your yeast mixture. Start adding the flour one cup at a time, stirring after each addition. After about 4 cups, the dough will start getting thick and harder to stir. Keep going until you’ve added all the flour and everything is combined.
Step 3: Knead it out
Turn the dough out onto a lightly floured surface. Knead for about 8-10 minutes. You’re looking for smooth and elastic dough that bounces back when you poke it.
If you’re using a stand mixer, use the dough hook and let it run on medium-low for about 6-8 minutes.
Step 4: First rise
Put the dough in a greased bowl, turning it once so the top is greased too. Cover with a clean kitchen towel and let it rise in a warm place for about an hour, or until it’s doubled in size.
The dough should look puffy and when you gently press it with your finger, the indent should slowly spring back.
Step 5: Shape the loaves
Punch down the dough (this is the fun part). Turn it out onto a lightly floured surface and divide it in half. Shape each half into a loaf by flattening it into a rectangle, then rolling it up tightly from the short end. Pinch the seams closed.
Step 6: Second rise
Place each loaf seam-side down in a greased 9×5 inch loaf pan. Cover with the towel again and let them rise for another 30-40 minutes. They should rise about an inch above the rim of the pan.
Step 7: Bake
Preheat your oven to 350°F (175°C). Bake the loaves for 30-35 minutes, until the tops are golden brown and the bread sounds hollow when you tap it.
Step 8: Finish and cool
As soon as you pull the loaves from the oven, brush the tops with melted butter. This gives them that beautiful golden color and keeps the crust soft.
Let them cool in the pans for 10 minutes, then turn them out onto a cooling rack. I know it’s torture, but let them cool completely before slicing. If you cut into them while they’re hot, you’ll squish all that beautiful texture.
Substitutions and Variations
Whole Wheat: Replace up to half the bread flour with whole wheat flour. The bread will be denser but more nutritious. You might need to add a tablespoon or two more water.
Honey instead of sugar: Use 1/2 cup honey in place of the white sugar for a subtle sweetness and softer crumb.
Dairy milk: Swap the water for whole milk to make an even richer, softer loaf. Heat it to lukewarm before using.
Herbs and cheese: After the first rise, knead in 1/4 cup grated parmesan and 2 tablespoons of Italian seasoning for a savory version.
Cinnamon swirl: Before rolling up the loaves, spread them with softened butter and sprinkle with cinnamon sugar. Roll tightly and bake as directed.
Make Ahead Tips
The dough can be refrigerated after the first rise. Punch it down, cover the bowl tightly with plastic wrap, and refrigerate for up to 24 hours.
When you’re ready to bake, take it out, let it come to room temperature for about 30 minutes, then shape and do the second rise as usual.
You can also freeze the baked loaves. Let them cool completely, wrap tightly in plastic wrap and then in aluminum foil, and freeze for up to 3 months. Thaw at room temperature.
Leftovers and Storage
Store the bread at room temperature in a plastic bag or airtight container for 3-4 days. Don’t refrigerate it – that actually makes it go stale faster.
For longer storage, slice the loaf and freeze it. You can pull out individual slices and toast them straight from frozen. Game changer for busy mornings.
Stale bread isn’t a loss. Turn it into French toast, bread pudding, croutons, or breadcrumbs. I actually make a fresh loaf every week just so I have good bread for French toast on the weekends.
Nutritional Information
Per slice (assuming 12 slices per loaf):
- Calories: 195
- Protein: 5g
- Carbohydrates: 37g
- Fat: 3g
- Fiber: 1g
- Sugar: 6g
- Sodium: 147mg
Keep in mind these are estimates and will vary based on exact measurements and any substitutions you make.
FAQ
Why didn’t my bread rise?
Usually this means your yeast was dead or the water was too hot. Check the expiration date on your yeast and make sure your water is just warm, not hot.
Can I make this without a stand mixer?
Yes! I made this by hand for months before getting a mixer. It just takes a little more elbow grease during the kneading step.
My bread is too dense – what happened?
You probably added too much flour or didn’t let it rise long enough. The dough should be slightly sticky, and each rise should roughly double the size.
Can I use instant yeast instead?
Absolutely. Use the same amount and you can skip the step where you let it foam. Just mix it right in with the flour.
Why is my crust too hard?
Brushing with butter right when it comes out of the oven helps keep the crust soft. Also make sure you’re storing it in an airtight container or bag.
How do I know when it’s done baking?
The top should be golden brown and when you tap the bottom of the loaf, it should sound hollow. An instant-read thermometer should read about 190°F in the center.
Can I double the recipe?
Sure, but you’ll need a really big bowl for mixing. It might be easier to just make it twice.
Wrapping Up
Making your own sandwich bread isn’t just about saving money or knowing what’s in your food (though those are both solid reasons).
There’s something really satisfying about pulling a loaf of homemade bread out of your oven. The smell, the texture, the way it slices perfectly for a sandwich or toasts up beautifully for breakfast.
And once you’ve made this a few times, it becomes second nature. Measure, mix, rise, shape, rise, bake. You’ll start timing it with other parts of your day, letting it rise while you work or catching up on a show.
Give it a try this weekend. Your kitchen (and your taste buds) will thank you.
Drop a comment below if you make this! I love hearing how it turned out and any tweaks you made to make it your own. And if you have questions, ask away – I’m happy to help troubleshoot.