You know that sad plate of chips with a sprinkle of cheese you get at most restaurants?
This isn’t that.
This is the kind of nacho plate that makes you cancel dinner plans because you ate the whole thing for lunch and have zero regrets.
I’m talking perfectly seasoned ground beef, layers of melted cheese that actually reach every corner, and toppings that turn each bite into something you want to remember. The kind of nachos that make you think about them three days later while you’re sitting in a meeting.
And here’s the thing: they’re stupid easy to make.
No fancy ingredients. No complicated techniques. Just real food that tastes like you spent way more effort than you actually did.
I’ve made these nachos for game days, random Tuesday nights when I didn’t feel like cooking anything complicated, and even brought them to parties where people asked for the recipe before they’d even finished eating.
They’re that good.
So if you’re tired of disappointing nachos and want something that’ll actually fill you up and make you happy, let’s make it happen.
What You’ll Need
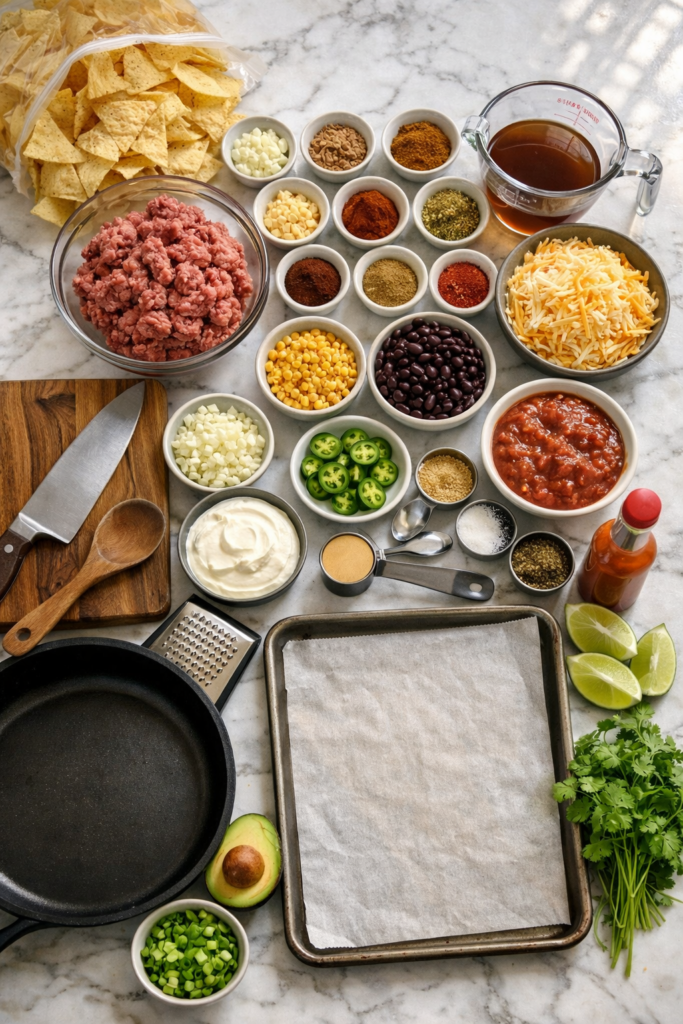
For the Beef:
- 1 pound ground beef (80/20 works great)
- 1 small onion, finely diced
- 3 garlic cloves, minced
- 2 tablespoons chili powder
- 1 tablespoon cumin
- 1 teaspoon paprika
- 1 teaspoon oregano
- ½ teaspoon cayenne pepper (optional, if you like heat)
- Salt and black pepper to taste
- ½ cup beef broth or water
For the Nachos:
- 1 large bag tortilla chips (about 13 oz)
- 3 cups shredded cheese (Mexican blend or sharp cheddar)
- 1 can black beans, drained and rinsed
- 1 cup corn kernels (frozen or canned)
- 2-3 jalapeños, sliced
- ½ cup sour cream
- ½ cup salsa
- 1 avocado, diced (or guacamole)
- Fresh cilantro, chopped
- 1 lime, cut into wedges
- Hot sauce (optional)
- Sliced green onions for garnish
Tools You’ll Need
- Large skillet or frying pan
- Large baking sheet
- Parchment paper or aluminum foil
- Wooden spoon or spatula
- Sharp knife and cutting board
- Measuring cups and spoons
- Cheese grater (if not using pre-shredded)
Pro Tips
Layer like you mean it. Don’t just dump everything on top and hope for the best. Do two layers: chips, cheese, beef, beans, then repeat. This way you get flavor in every single bite instead of naked chips at the bottom.
Don’t skip the broil. After baking, hit those nachos with 2-3 minutes under the broiler. You’ll get those crispy, golden cheese edges that make nachos actually worth eating. Just watch them like a hawk because the line between perfect and burnt is about 30 seconds.
Season the beef properly. I see people just browning ground beef and calling it done. No. Let those spices cook in the meat for a few minutes with some liquid. It makes a huge difference between “meh” and “I want seconds.”
Temperature matters. Room temperature cheese melts way better than cold cheese straight from the fridge. Take it out while you’re browning the beef.
Size matters for your pan. Use the biggest baking sheet you have. Crowded nachos = soggy nachos. You want them spread out so the heat can get everywhere.
Substitutions and Variations
Meat alternatives: Ground turkey or chicken work great if you want something lighter. Ground pork is also really good. For vegetarian nachos, skip the meat entirely and double up on the beans, or use crumbled tempeh or plant-based ground.
Cheese options: Monterey Jack, pepper jack (if you like spice), or a mix of cheddar and mozzarella all work. Queso fresco crumbled on top at the end is a nice touch.
Bean swaps: Pinto beans or refried beans instead of black beans. You can even use both.
Heat level: Skip the cayenne and jalapeños for mild nachos. Add diced fresh habaneros or serrano peppers if you want to feel alive.
Toppings: Pickled red onions, diced tomatoes, black olives, shredded lettuce, or even pulled pork can all make an appearance.
Make Ahead Tips
The beef: Cook it up to 3 days ahead and store it in an airtight container in the fridge. Just reheat it before assembling your nachos.
Prep the toppings: Dice your avocado and toss it with a little lime juice to keep it from browning. Chop your cilantro and green onions. Slice your jalapeños. Store everything separately in the fridge.
The nachos themselves: These are definitely a make-and-eat situation. Once they’re out of the oven, you’ve got about 10 minutes before they start getting soggy. Don’t try to make them ahead.
How to Make Loaded Beef Nachos
Cook the Beef
Heat your skillet over medium-high heat. Add the ground beef and break it up with your wooden spoon.
Cook it until it’s browned, about 6-8 minutes. You want some crispy bits in there.
Drain most of the fat (leave a tablespoon or so for flavor), then add your diced onion. Cook for 3-4 minutes until the onion gets soft and starts to brown a little.
Toss in the garlic and cook for another minute until it smells amazing.
Season It Up
Add all your spices: chili powder, cumin, paprika, oregano, cayenne (if using), salt, and pepper.
Stir everything together and let it cook for about 2 minutes. This step is huge because it wakes up all those spices.
Pour in your beef broth and let it simmer until most of the liquid has cooked off, about 5 minutes.
You want the meat to be nicely coated but not swimming in liquid.
Build Your Nachos
Preheat your oven to 375°F (190°C).
Line your biggest baking sheet with parchment paper or foil. Makes cleanup so much easier.
Spread out half your tortilla chips in an even layer. Don’t pile them too high.
Sprinkle about 1 cup of cheese over the chips.
Add half the seasoned beef, then scatter half the black beans and corn on top.
Add a few jalapeño slices if you’re using them.
Now repeat: another layer of chips, more cheese (about 1 cup), the rest of the beef, remaining beans and corn, and more jalapeños.
Finish with your last cup of cheese on top.
Bake It
Slide that sheet into the oven and bake for 12-15 minutes.
You’re looking for the cheese to be completely melted and starting to bubble.
If you want (and you should), turn on your broiler and move the pan to the top rack.
Broil for 2-3 minutes, watching constantly, until you get those golden, crispy cheese edges.
Pull it out when it looks like the nachos you dream about.
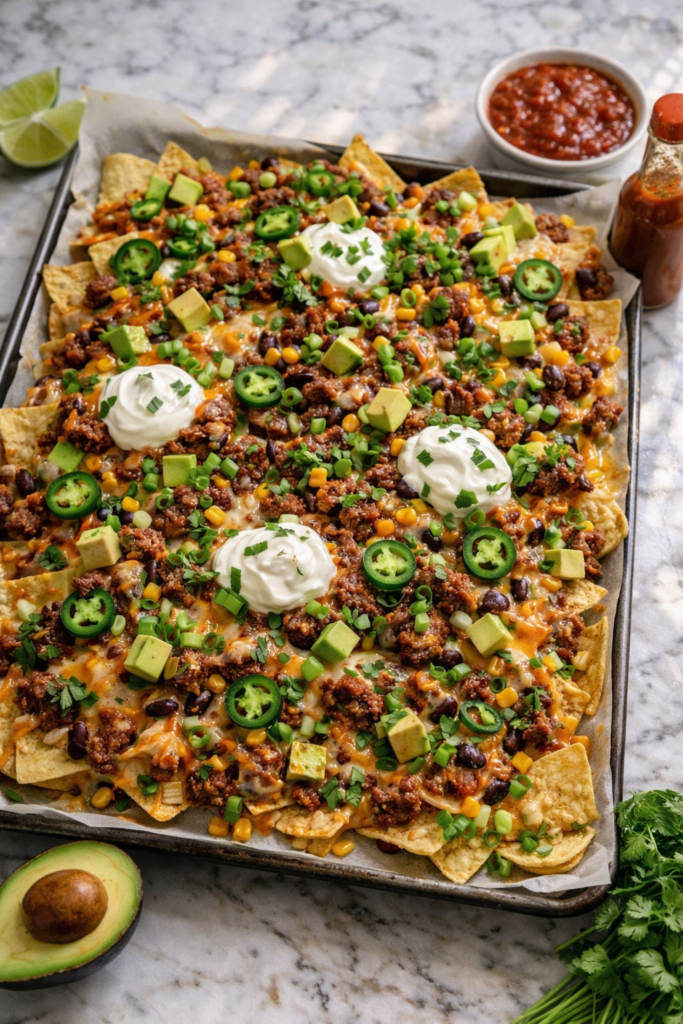
Top It Off
This is where things get fun.
Drizzle sour cream and salsa over the top. Don’t be shy.
Add your diced avocado or dollops of guacamole.
Scatter fresh cilantro all over.
Throw on your sliced green onions.
Squeeze lime wedges over everything.
Hot sauce if you’re into that.
Serve immediately while everything’s hot and the cheese is still melty.
Leftovers and Storage
Let’s be real: there probably won’t be leftovers.
But if there are, here’s the deal.
Storing: Don’t. Baked nachos get soggy in the fridge and reheating them won’t bring back that crunch.
What you CAN save: The seasoned beef keeps great for 3-4 days in an airtight container in the fridge. The toppings (except avocado) will last about the same.
Freezing the beef: It freezes beautifully for up to 3 months. Thaw it in the fridge overnight and reheat in a skillet.
Smart planning: If you think you’ll have leftovers, only make half the nachos and save the rest of your ingredients. You can always make a fresh batch later with the leftover beef.
Alternative: Turn leftover beef into tacos, burrito bowls, quesadillas, or even a loaded baked potato topping.
Additional Details
Nutrition (per serving, serves 6)
- Calories: ~580
- Protein: 28g
- Fat: 32g
- Carbs: 42g
- Fiber: 7g
- Sodium: 890mg
These numbers can vary based on your exact ingredients and how generous you are with toppings.
Time Breakdown
- Prep time: 15 minutes
- Cook time: 25-30 minutes
- Total time: 40-45 minutes
Meal Pairing Ideas
These nachos are pretty filling on their own, but if you want to make it a full meal:
Serve with: A simple side salad with lime vinaigrette, Mexican street corn, or chips and fresh salsa on the side.
Drinks: Ice-cold Mexican beer, margaritas, agua fresca, or even a Mexican Coke if you’re not drinking.
Make it a spread: Add some queso dip and tortilla chips for appetizers before the nachos come out.
Dietary Swaps
Keto: Use pork rinds instead of chips and skip the beans and corn. Load up on cheese, beef, and low-carb toppings like avocado and sour cream.
Dairy-free: Use dairy-free cheese alternatives or just skip the cheese and load up on all the other toppings.
Gluten-free: Most tortilla chips are naturally gluten-free, but always check the label to be sure.
Lower calorie: Use ground turkey, reduce the cheese by half, and pile on extra veggies like bell peppers and tomatoes.
FAQ
Can I use steak instead of ground beef?
Absolutely. Thinly sliced steak (like flank or skirt steak) works great. Season it with the same spices and cook it hot and fast in a skillet.
How do I keep nachos from getting soggy?
Don’t overload the chips, use two layers instead of one big pile, and serve them immediately. Also, keep wet ingredients like salsa and sour cream on the side or on top (not in layers).
Can I make these in an air fryer?
Yes, but you’ll need to work in batches. Air fry at 350°F for about 5-7 minutes. The results are actually really good and crispy.
What’s the best cheese for nachos?
Pre-shredded Mexican blend is easy and works great. For the best melt, shred your own cheese (the pre-shredded stuff has anti-caking agents that can make it less melty).
Can I add other meats?
For sure. Shredded chicken, carnitas, chorizo, or even leftover brisket all work. You can also do a meat combo.
How do I make vegetarian nachos?
Skip the beef and load up on beans, corn, grilled peppers and onions, mushrooms, or plant-based meat alternatives.
Can I use a different type of chip?
Restaurant-style thick tortilla chips work best because they hold up to all the toppings. Thin chips will get soggy fast.
How do I reheat nachos?
You can’t really reheat assembled nachos and get good results. Your best bet is to save the components separately and rebuild fresh nachos when you want them.
Wrapping Up
These loaded beef nachos are the real deal.
They’re not trying to be fancy or complicated. They’re just really, really good food that happens to be covered in cheese and makes people happy.
The kind of recipe you’ll make on repeat because it works every single time and nobody ever complains.
Make them for your next gathering. Make them for yourself on a random weeknight. Make them because you’re craving something satisfying and delicious that doesn’t require you to be a professional chef.
Then come back and tell me how they turned out. Did you add any extra toppings? Change up the spices? Make them spicier or milder?
Drop a comment below and let me know your nacho strategy. 🌮