I’m not talking about those sad desk lunch sandwiches you grab from the corner store.
This is the kind of sandwich that makes you pause mid-bite because you can’t believe something this simple tastes this good. The kind that has you planning tomorrow’s lunch before you’ve even finished today’s.
And here’s the thing: most sandwich recipes overcomplicate everything. They throw in a dozen ingredients you don’t have and turn lunch into a production.
But this one? It keeps things simple while delivering flavor that’ll have you rethinking your entire sandwich game.
I’ve been making this on repeat for the past few months, and it’s become my go-to whenever I need something quick but don’t want to compromise on taste. My husband literally requests it at least twice a week now.
So if you’re tired of boring sandwiches that fall apart or taste like cardboard, let’s fix that.
What You’ll Need
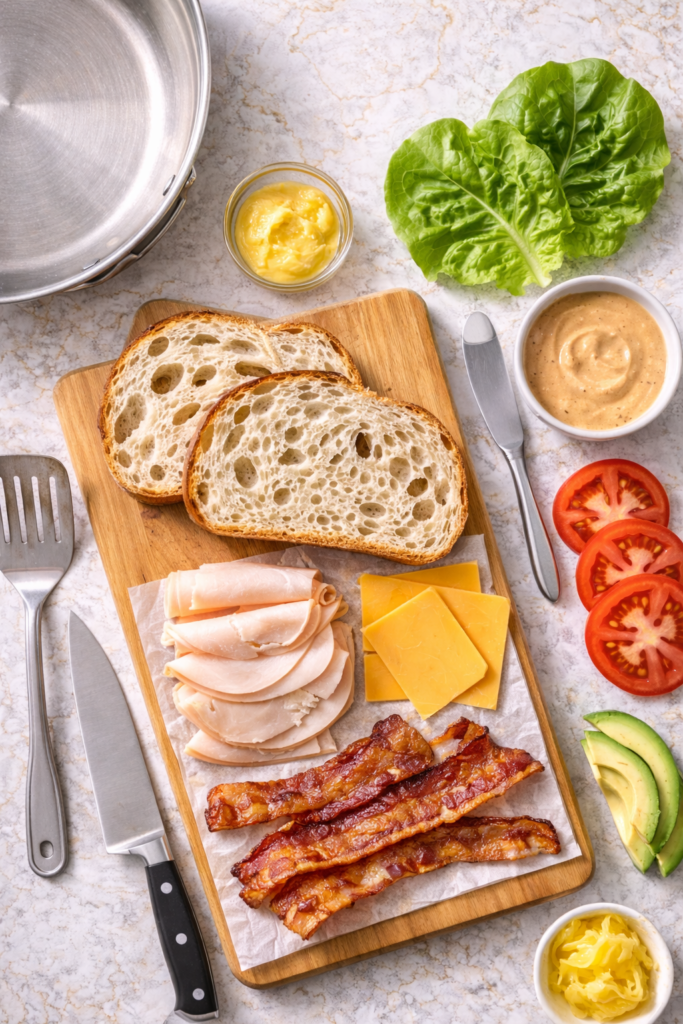
The Sandwich Base
| Ingredient | Amount | Why It Matters |
|---|---|---|
| Sourdough bread | 2 slices | Sturdy enough to hold everything without getting soggy |
| Deli turkey | 4 oz | High-quality matters here – skip the cheap stuff |
| Sharp cheddar | 2 slices | Acts as “glue” when melted |
| Bacon | 2 slices | Crispy is key |
| Avocado | 1/4, sliced | Adds creaminess |
| Butter lettuce | 2 leaves | Stays crisp longer than other varieties |
| Tomato | 3 slices | Room temp for best flavor |
| Butter | 2 tbsp | Softened, for that golden crust |
The Secret Sauce (Don’t Skip This!)
| Ingredient | Amount |
|---|---|
| Mayonnaise | 3 tbsp |
| Dijon mustard | 1 tbsp |
| Honey | 1 tsp |
| Garlic powder | 1/2 tsp |
| Black pepper | Pinch |
| Paprika | Pinch |
Time Breakdown:
- Prep: 8 minutes
- Cook: 7 minutes
- Total: 15 minutes
Tools You’ll Need
✓ Large skillet or griddle
✓ Small mixing bowl
✓ Sharp knife
✓ Cutting board
✓ Spatula
✓ Butter knife or pastry brush
Pro Tips
1. Toast Both Sides of Your Bread
This is the game-changer everyone skips.
Butter both sides of each slice and toast them in the pan until golden. This creates a barrier that keeps your sandwich from getting soggy, even hours later.
I learned this trick from a deli owner in Brooklyn and it’s changed everything.
2. Layer Strategically
The Golden Rule: Always put wet ingredients (tomatoes) between dry ones (lettuce or cheese).
Here’s the perfect layering order:
Top bread (sauce side down)
↓
Lettuce
↓
Tomato
↓
Avocado
↓
Cheese
↓
Bacon
↓
Turkey
↓
Cheese
↓
Sauce
↓
Bottom bread
This prevents the dreaded soggy bread situation. Think of it like building a moisture shield.
3. Make Extra Sauce
You’ll want this on everything.
It keeps in the fridge for a week and transforms any boring sandwich into something you’ll actually look forward to eating. I put it on wraps, burgers, even as a dip for fries.
Seriously, double the recipe. Thank me later.
4. Let Your Meat Come to Room Temperature
Cold meat right from the fridge makes for an uneven temperature sandwich.
Let it sit out for 10 minutes while you prep everything else. This small step makes a massive difference in how everything tastes together.
5. Press It Down While Cooking
Use your spatula to press the sandwich gently for the first 30 seconds.
This helps everything meld together and creates better contact with the pan for even toasting.
How to Make It
Step 1: Mix Your Secret Sauce
In a small bowl, whisk together:
- Mayo
- Dijon
- Honey
- Garlic powder
- Black pepper
- Paprika
This takes about 30 seconds and makes all the difference. Set it aside.
Step 2: Prep Your Ingredients
Start with the bacon. Cook it until crispy (I do mine in the same pan I’ll use for the sandwich). Pat dry with paper towels.
While bacon cooks:
- Slice your avocado
- Slice your tomatoes (3 thick slices)
- Wash and dry your lettuce leaves
- Let your turkey come to room temp
Step 3: Butter Your Bread
Spread softened butter on both sides of each slice.
Yes, both sides. Trust me on this one.
Step 4: Start Toasting
Heat your skillet over medium heat.
Place one slice of bread in the pan, butter side down. Let it toast for about 2 minutes until golden brown.
Flip it so the untoasted buttered side is now down.
Step 5: Build Your Sandwich
Working quickly while that second side toasts, spread half the secret sauce on the toasted top side.
Layer on:
- One slice of cheese
- The turkey (all of it)
- Bacon strips
- Second slice of cheese
Pro Tip: This cheese placement is intentional. It melts slightly and acts like glue, holding everything together.
Step 6: Add the Fresh Stuff
Top with:
- Avocado slices (fanned out)
- Tomato slices
- Lettuce leaves
Spread the remaining sauce on one side of your second bread slice.
Step 7: Toast the Second Slice
While your bottom half sits in the pan, place your second bread slice in the pan next to it, butter side down.
Toast for 2 minutes, flip, toast another minute.
Step 8: Bring It Together
Place your toasted second slice (sauce side down) on top of your stacked ingredients.
Press down gently with your spatula. Let the whole sandwich sit in the pan for another minute, pressing occasionally, so everything warms through and the cheese gets melty.
Step 9: Slice and Serve
Cut diagonally (always diagonally, it just tastes better that way).
Eat immediately while everything’s warm and crispy.
Total cook time: About 15 minutes from start to finish.
Substitutions and Variations
Bread Options
| Instead of Sourdough | Try This |
|---|---|
| Ciabatta | Great for a chewier texture |
| Whole wheat | Adds nutty flavor |
| Rye | Perfect if you like stronger bread flavor |
| Croissant | When you’re feeling fancy 🥐 |
Just make sure it’s sturdy enough to hold up to the fillings.
Protein Swaps
Grilled chicken – Slice it thin and warm it up
Ham – Go for the good deli stuff
Roast beef – Adds a heartier flavor
Portobello mushroom – For a vegetarian version that actually satisfies
I’ve done all of these and they’re all solid.
Cheese Alternatives
- Swiss – Classic and melts beautifully
- Provolone – Mild and creamy
- Pepper jack – Adds a nice kick if you like things spicy
- Gouda – Smoky and rich
Make It Your Own
| Modification | What to Do | Result |
|---|---|---|
| Skip the bacon | Replace with sun-dried tomatoes | Different flavor profile, still packed with taste |
| Make it lighter | Use Greek yogurt instead of mayo | Cuts calories significantly |
| Spice it up | Add sliced jalapeños to sauce | Perfect heat level |
| Add crunch | Include thin apple slices | Sweet + savory combo |
| Go Italian | Use pesto instead of secret sauce | Completely different vibe |
Make Ahead Tips
The secret sauce can be made up to a week in advance and stored in an airtight container in the fridge.
Cook your bacon ahead of time. It keeps in the fridge for 3-4 days and reheats well. Just pop it in the microwave for 15-20 seconds.
Prep your veggies the night before. Store them separately in the fridge, and keep tomatoes at room temperature for better flavor.
⚠️ Don’t assemble the sandwich until you’re ready to eat it. Even with the toasting trick, pre-made sandwiches just aren’t the same.
Leftovers and Storage
Storage Guide
| Item | How to Store | Lasts |
|---|---|---|
| Assembled sandwich | Wrapped in foil/plastic wrap | 24 hours max |
| Secret sauce | Airtight container in fridge | 1 week |
| Cooked bacon | Airtight container in fridge | 3-4 days |
| Sliced veggies | Separate containers | 2-3 days |
Reheating Tips
Here’s the reality: this sandwich is best eaten fresh.
But if you have leftovers (which rarely happens in my house), here’s what to do:
- Remove lettuce and tomato first
- Wrap in foil
- Warm in a 350°F oven for about 10 minutes
Or use a panini press if you have one.
The secret sauce keeps for a week in the fridge and honestly makes everything better. I find myself reaching for it constantly.
Nutritional Breakdown
Per Sandwich
| Nutrient | Amount | % Daily Value* |
|---|---|---|
| Calories | 650 | – |
| Protein | 35g | 70% |
| Carbohydrates | 45g | 15% |
| Fat | 38g | 49% |
| Fiber | 6g | 21% |
| Sodium | 1,450mg | 63% |
| Sugar | 8g | – |
*Based on a 2,000 calorie diet
Want to Make It Lighter?
Easy swaps to cut calories:
| Change This | To This | Saves |
|---|---|---|
| 2 cheese slices | 1 cheese slice | ~100 cal |
| Regular bacon | Turkey bacon | ~50 cal |
| 3 tbsp mayo | 2 tbsp mayo | ~70 cal |
| Butter both sides | Butter one side | ~100 cal |
You can easily drop this to around 430 calories with these changes.
Perfect Pairings
This sandwich pairs perfectly with:
🍟 Sweet potato fries – The contrast is unreal
🥗 Simple side salad – Keep it light with vinaigrette
🥔 Kettle chips – I’m partial to sea salt and vinegar
🍲 Tomato soup – Ultimate comfort meal combo
🍺 Cold IPA or sparkling water – Your choice
I usually just grab whatever chips we have in the pantry and call it lunch. Sometimes keeping things simple is the move.
Quick Reference Guide
Sandwich Success Checklist
✓ Butter both sides of bread
✓ Toast in pan, not toaster
✓ Cheese on top AND bottom
✓ Press sandwich while cooking
✓ Let meat come to room temp
✓ Make sauce from scratch
✓ Cut diagonally
✓ Eat immediately
Common Mistakes to Avoid
❌ Using cold ingredients straight from fridge
❌ Skipping the butter on both sides
❌ Putting tomatoes directly on bread
❌ Not pressing the sandwich down
❌ Using flimsy bread that can’t hold up
❌ Overcrowding with too many ingredients
FAQ
Can I make this without a skillet?
Yes. Use a panini press, sandwich maker, or even toast the bread separately in a toaster and assemble cold.
It won’t have quite the same magic, but it’ll still be good.
How do I keep the avocado from browning?
Slice it right before you’re ready to eat.
If you must prep ahead, squeeze a little lemon juice on the slices and store in an airtight container. It’ll buy you a few extra hours.
Can I use store-bought sauce instead?
Sure, but you’re missing out.
The homemade version takes 30 seconds and tastes way better than anything you’ll buy. Plus you can control the flavor exactly how you like it.
My sandwich keeps falling apart. What am I doing wrong?
You’re probably doing one of these things:
- Overstuffing it with too many fillings
- Not pressing it down while cooking
- Using bread that’s too soft or thin
- Forgetting the cheese “glue” layer
Less is more sometimes. Also make sure you’re using sturdy bread.
Is this sandwich good cold?
It’s fine cold, but it’s absolutely better warm.
The melted cheese and crispy bread make it what it is. If you’re meal prepping, I’d suggest assembling it fresh each day rather than making them all at once.
Can I freeze these?
I wouldn’t recommend it.
The texture of the vegetables and bread doesn’t hold up well to freezing. Just make them fresh – they only take 15 minutes anyway.
What if I don’t like mustard?
Leave it out of the sauce. You’ll lose some of that tangy kick, but it’ll still taste great with just the mayo, honey, and spices.
Can kids eat this?
Absolutely!
My friend’s 5-year-old goes crazy for these. If they’re picky about the sauce, just serve it on the side for dipping.
How do I make this for a crowd?
Set up a sandwich bar! Lay out all the ingredients and let people build their own.
Toast the bread ahead of time and keep it warm in a low oven. Make a big batch of sauce. Works great for parties or game days.
Wrapping Up
This sandwich might seem simple, but that’s exactly why it works.
You’re not hunting down specialty ingredients or spending an hour in the kitchen. You’re just combining good quality basics in a way that makes them shine.
And once you nail the technique (especially that double-sided toasting trick), you’ll find yourself making this on repeat.
It’s become my default lunch when I work from home, and I genuinely look forward to it every time.
Give it a try this week. And when you do, come back and let me know what you think.
Did you add anything extra? Swap out any ingredients? Change up the sauce? I love hearing how people make recipes their own.
Drop a comment below with your results or any questions. I usually respond within a day or two and love chatting about food with you all 😊