
Ever notice how Mongolian beef at restaurants tastes nothing like anything you make at home?
I mean, that glossy sauce, those perfectly tender strips of beef, the way it clings to every piece without being too sticky or too thin.
For years I thought it was some complicated restaurant secret.
Turns out, it’s actually one of the easiest Asian dishes you can make at home. And once you know the tricks (I’m giving you all of them), you’ll wonder why you ever bothered ordering takeout.
I’m talking about beef so tender it practically melts, a sauce that’s sweet and savory in all the right ways, and a dinner that goes from fridge to table in 30 minutes flat.
Let me show you how to make it.
Quick Recipe Overview
| Prep Time | Cook Time | Total Time | Servings | Difficulty |
|---|---|---|---|---|
| 15 minutes | 15 minutes | 30 minutes | 4 people | Easy |
Cuisine: Chinese-American
Diet: Can be made gluten-free
Main Ingredients: Flank steak, soy sauce, brown sugar
What You’ll Need
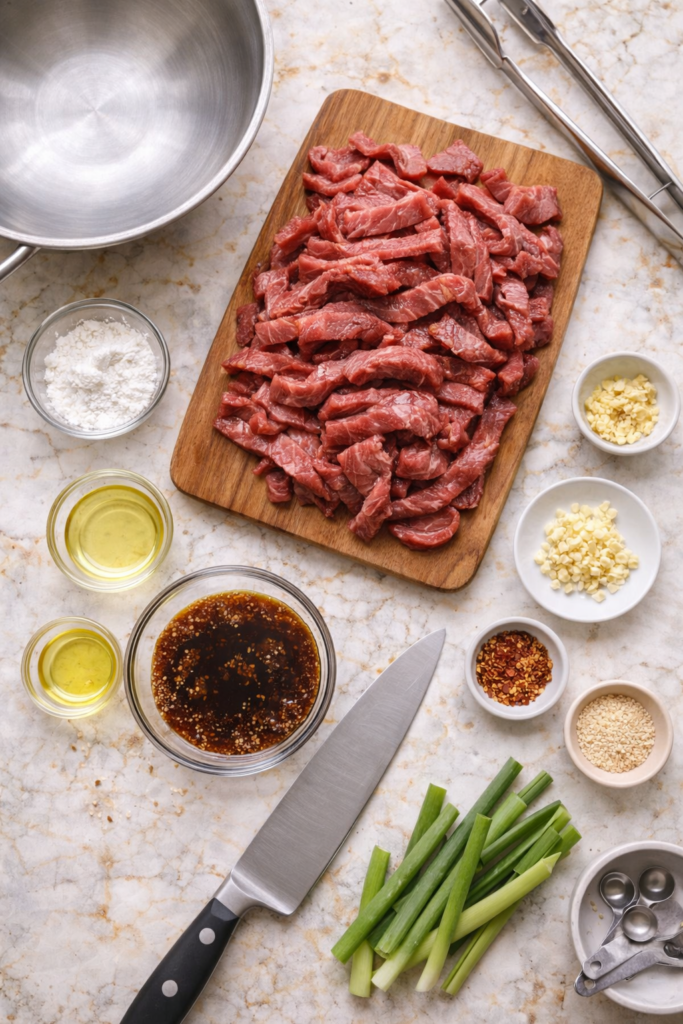
For the Beef
| Ingredient | Amount | Notes |
|---|---|---|
| Flank steak | 1½ pounds | Sliced thin against the grain |
| Cornstarch | ¼ cup | For coating |
| Vegetable oil | 2 tablespoons | Or any high-heat oil |
For the Sauce
| Ingredient | Amount | Why It Matters |
|---|---|---|
| Low-sodium soy sauce | ½ cup | Controls the saltiness |
| Water | ½ cup | Thins the sauce perfectly |
| Dark brown sugar | ⅔ cup | Creates that glossy sweetness |
| Fresh ginger | 1 teaspoon, minced | Adds warmth and depth |
| Garlic | 3 cloves, minced | Because garlic makes everything better |
| Red pepper flakes | ¼ teaspoon | Optional, for heat |
For Serving
- 3 green onions, cut into 2-inch pieces
- Sesame seeds (optional, but they look pretty)
- Cooked white or brown rice
Tools You’ll Need
You don’t need fancy equipment for this one.
Essential:
- Large bowl for coating the beef
- Wok or large skillet (12-inch works great)
- Small bowl for mixing the sauce
- Sharp knife for slicing
- Cutting board
Nice to Have:
- Tongs or wooden spoon
- Measuring cups and spoons
- Paper towels for patting beef dry
Pro Tips
Here’s what I’ve learned after making this more times than I can count.
1. Freeze your beef for 15-20 minutes before slicing
This is the game-changer.
When the meat is slightly firm, you can slice it paper-thin without any struggle. Thin slices = tender beef. Thick slices = chewy disappointment.
2. Cut against the grain, not with it
Look at your flank steak. See those lines running through it? That’s the grain.
You want to slice perpendicular to those lines. This shortens the muscle fibers and makes every bite incredibly tender.
3. Don’t skip the cornstarch coating
I know it seems like an extra step, but this is what gives you that crispy exterior and helps the sauce stick.
Just toss the beef in cornstarch right before cooking. Don’t do it too early or it gets gummy.
4. High heat is your friend
You want that wok or skillet screaming hot.
This sears the beef quickly and keeps it from steaming. If your pan isn’t hot enough, you’ll end up with gray, sad beef instead of crispy, caramelized pieces.
5. Work in batches
Crowding the pan drops the temperature and makes everything steam instead of sear.
Cook the beef in 2-3 batches, even if it feels tedious. Your taste buds will thank you.
How to Make Mongolian Beef
Alright, let’s get into it.
Step 1: Prep Your Beef
Slice your flank steak against the grain into thin strips, about ¼-inch thick.
If you froze it for 15 minutes first, this should be super easy.
Pat the beef dry with paper towels. Moisture is the enemy of crispy beef.
Quick Tip: Can’t tell which way the grain runs? Look closely at the meat. You’ll see parallel lines running in one direction. Cut perpendicular to those lines.
Step 2: Make the Sauce
In a small bowl, whisk together:
- Soy sauce
- Water
- Brown sugar
- Ginger
- Garlic
- Red pepper flakes (if using)
Set it aside. The brown sugar might not dissolve completely yet, and that’s fine. It’ll melt once it hits the heat.
Step 3: Coat the Beef
Toss the beef strips in cornstarch.
Make sure every piece is coated, but shake off any excess. You want a light dusting, not a thick crust.
Step 4: Sear the Beef
Heat 1 tablespoon of oil in your wok or skillet over high heat until it’s shimmering.
Add half the beef in a single layer. Don’t move it around.
Let it sear for about 1-2 minutes until it gets crispy and golden brown on one side.
Flip and cook another minute on the other side.
Remove to a plate and repeat with the remaining beef and another tablespoon of oil.
Step 5: Make the Sauce
Once all the beef is cooked, turn the heat down to medium.
Add your sauce mixture to the pan.
It’ll bubble up immediately. Let it simmer for about 2-3 minutes, stirring occasionally, until it thickens into a glossy glaze.
Step 6: Bring It All Together
Add the beef back to the pan along with the green onions.
Toss everything together until every piece is coated in that beautiful, shiny sauce.
Cook for another minute, just to heat everything through.
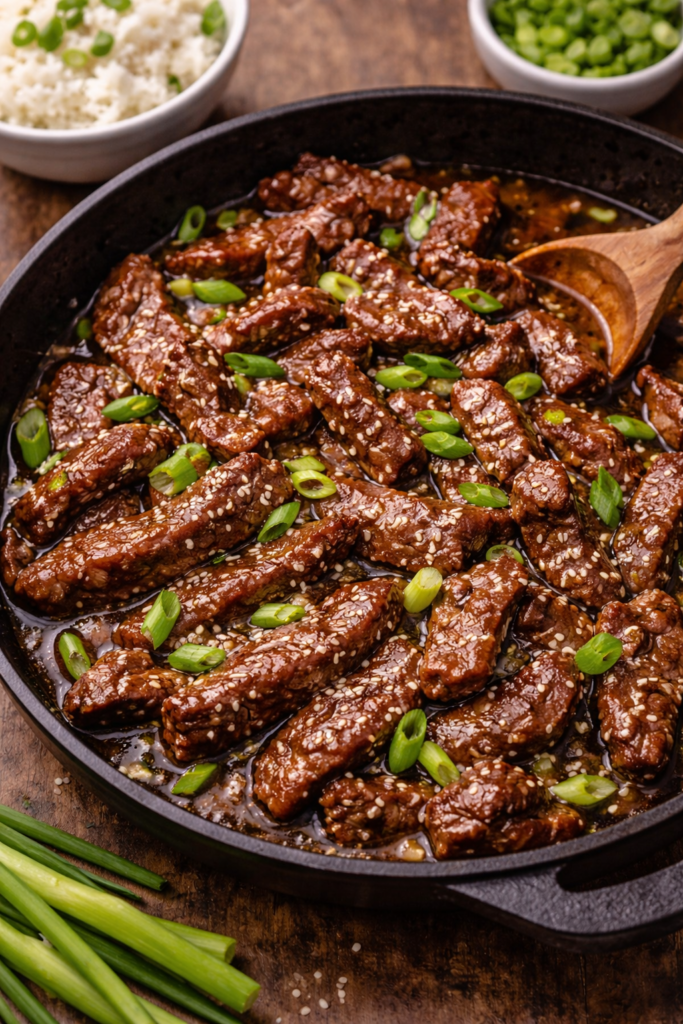
Step 7: Serve
Pile it over rice, sprinkle with sesame seeds if you’re feeling fancy, and dig in.
Complete Step-by-Step Timeline
| Time | What You’re Doing | Temperature |
|---|---|---|
| 0:00 | Slice beef, prep ingredients | – |
| 0:10 | Make sauce, coat beef in cornstarch | – |
| 0:15 | Heat oil in wok | High heat |
| 0:16 | Sear first batch of beef | High heat |
| 0:19 | Remove batch 1, cook batch 2 | High heat |
| 0:22 | Add sauce to pan | Medium heat |
| 0:25 | Toss beef and green onions in sauce | Medium heat |
| 0:30 | Serve over rice | – |
Substitutions and Variations
Different Proteins
| Protein | How to Adapt | Cook Time |
|---|---|---|
| Chicken thighs | Cut into strips, cook same way | 3-4 minutes per batch |
| Pork tenderloin | Slice thin like beef | 2-3 minutes per batch |
| Shrimp | Skip cornstarch, don’t overcook | 2 minutes total |
| Tofu | Use extra-firm, press well, coat in cornstarch | 3-4 minutes per batch |
Sauce Adjustments
Want it less sweet? Cut the brown sugar down to ½ cup.
Want more heat? Double the red pepper flakes or add a teaspoon of sriracha.
Gluten-free? Use tamari instead of soy sauce.
Darker sauce? Use dark soy sauce for half the amount.
Extra Veggies You Can Add
- Broccoli florets
- Snap peas
- Sliced bell peppers (red or orange look gorgeous)
- Baby corn
- Water chestnuts for crunch
- Mushrooms
Just make sure they’re cut small enough to cook quickly. Add them when you add the green onions.
Low-Carb Version
Serve over cauliflower rice or zucchini noodles instead of regular rice.
The sauce has sugar, so it won’t be completely low-carb, but you’ll save a ton of carbs by skipping the rice.
Make Ahead Tips
You can prep parts of this ahead to make dinner even faster.
| What to Prep | How Long It Keeps | Storage |
|---|---|---|
| Sliced beef | 24 hours | Airtight container, fridge |
| Mixed sauce | 3 days | Jar or container, fridge |
| Fully cooked dish | 3 days | Airtight container, fridge |
| Cooked and frozen | 2 months | Freezer-safe container |
Full make-ahead: Cook the whole dish, let it cool, and refrigerate. Reheat in a skillet over medium heat with a splash of water to loosen the sauce.
Leftovers and Storage
Store leftovers in an airtight container in the fridge for up to 3 days.
To reheat: Use the stovetop instead of the microwave.
Add a tablespoon or two of water to the pan and heat over medium until warmed through. This keeps the sauce from getting too thick and the beef from drying out.
Freezing: It works, but the texture of the beef changes a bit. If you do freeze it, thaw overnight in the fridge and reheat on the stove.
Storage Hack: Portion leftovers into individual servings before refrigerating. Then you can grab one for lunch without reheating the whole batch.
Nutritional Information
| Nutrient | Per Serving (without rice) |
|---|---|
| Calories | 520 |
| Protein | 38g |
| Carbohydrates | 52g |
| Fat | 16g |
| Fiber | 1g |
| Sugar | 35g |
| Sodium | 1,280mg |
Based on 4 servings. Add about 200 calories per cup of cooked white rice.
Macros Breakdown:
| Percentage of Daily Value* | |
|---|---|
| Protein | 76% |
| Carbs | 17% |
| Fat | 21% |
*Based on a 2,000 calorie diet
What to Serve With Mongolian Beef
Classic Pairings
Rice Options:
- Steamed white or jasmine rice (my go-to)
- Egg fried rice
- Brown rice for something healthier
- Cauliflower rice for low-carb
Side Dishes That Work
| Side Dish | Why It Works | Prep Time |
|---|---|---|
| Steamed edamame | Adds protein and a salty crunch | 5 min |
| Asian cucumber salad | Cool and refreshing contrast | 10 min |
| Egg rolls | Because who doesn’t love egg rolls? | 20 min (or buy frozen) |
| Stir-fried bok choy | Light and doesn’t compete with flavors | 8 min |
| Miso soup | Warm and comforting starter | 10 min |
Drinks
- Hot green tea
- Iced jasmine tea
- Light beer like Tsingtao
- Sake if you’re feeling fancy 🍶
Mongolian Beef vs. Other Stir-Fries
Curious how this stacks up against other popular dishes?
| Dish | Sweetness Level | Spice Level | Veggies | Sauce Thickness |
|---|---|---|---|---|
| Mongolian Beef | High | Low-Medium | Minimal | Thick & glossy |
| Kung Pao Chicken | Medium | High | Lots | Medium |
| Beef and Broccoli | Low | None | Moderate | Medium |
| Orange Chicken | Very High | None | None | Very thick |
| General Tso’s | High | Medium | Minimal | Thick |
Quick Cooking Tips for Beginners
How do I know when the oil is hot enough?
Sprinkle a tiny bit of cornstarch into the pan. If it sizzles immediately, you’re good to go.
My sauce is too thick. Help!
Add water, a tablespoon at a time, and stir until you get the consistency you want.
My sauce is too thin.
Let it simmer a bit longer. The cornstarch from the beef usually thickens it up.
If it’s still runny after a few minutes, mix ½ teaspoon cornstarch with 1 tablespoon water and stir it in.
Can I use a different cut of beef?
Flank steak is ideal because it’s lean and slices easily.
But skirt steak or sirloin work too. Just avoid anything too fatty or it’ll get greasy.
Beef Cuts Comparison
| Cut | Tenderness | Price | Slicing Ease | Best For |
|---|---|---|---|---|
| Flank steak ⭐ | Good | $$ | Very easy | This recipe! |
| Skirt steak | Good | $$ | Easy | Also great |
| Sirloin | Very good | $$$ | Medium | Works well |
| Ribeye | Excellent | $$$$ | Hard (too fatty) | Skip it |
| Chuck | Tough | $ | Medium | Too chewy |
Common Mistakes to Avoid
❌ Not slicing against the grain = Chewy, tough beef
✅ Slice perpendicular to the muscle fibers
❌ Overcrowding the pan = Steamed, gray beef
✅ Work in small batches with space between pieces
❌ Using low heat = Soggy coating
✅ Crank that heat to high
❌ Coating beef too early = Gummy cornstarch
✅ Coat right before cooking
❌ Skipping the freeze step = Uneven, thick slices
✅ Pop it in the freezer for 15-20 minutes
FAQ
Is Mongolian beef actually from Mongolia?
Nope! It’s a Chinese-American creation that became popular in the U.S. in the 1950s and 60s.
The name probably comes from the Mongolian BBQ style of cooking, but the dish itself isn’t traditional Mongolian food.
Can I make this less sweet?
Absolutely. Cut the brown sugar in half or use honey for a more subtle sweetness.
Some people even use just 3 tablespoons of sugar and love it.
What’s the best way to slice beef thin?
Partially freeze it for 15-20 minutes first.
This firms it up just enough to make slicing easier. Always cut against the grain.
Can I use pre-sliced stir-fry beef?
Sure, if you’re in a rush.
Just make sure the pieces are thin. If they’re thick, you won’t get that melt-in-your-mouth texture.
How do I keep the beef from getting tough?
Three things:
- Slice it thin
- Cut against the grain
- Don’t overcook it
High heat for a short time is the way to go.
Can I double this recipe?
Yes, but you’ll need to work in even smaller batches when cooking the beef.
Don’t crowd the pan or it’ll steam instead of sear.
What if I don’t have a wok?
A large skillet works perfectly.
Just make sure it’s at least 12 inches so you have enough room to spread out the beef.
Can I add vegetables?
Go for it. Broccoli, bell peppers, and snap peas are all great.
Add them when you add the green onions so they stay crisp-tender.
Why is my sauce not sticking to the beef?
You probably didn’t coat the beef in enough cornstarch, or your sauce needs to reduce more.
Let it simmer another minute or two.
Can I use chicken breast instead of thighs?
You can, but thighs stay way more tender and juicy.
If you use breast, cut it thin and don’t overcook it.
Recipe Variations from Around the Web
Want to switch things up? Here’s how different cooks make this dish:
| Variation | What’s Different | Flavor Profile |
|---|---|---|
| Spicy Mongolian Beef | Add 1-2 tablespoons chili paste | Sweet, savory, fiery |
| Honey Mongolian Beef | Replace brown sugar with honey | Floral, less caramelized |
| Mongolian Beef with Veggies | Add broccoli, peppers, snap peas | More colorful, balanced |
| Keto Mongolian Beef | Use monk fruit sweetener, no cornstarch | Low-carb, less crispy |
| Slow Cooker Version | Cook on low 4 hours | Fall-apart tender |
Why This Recipe Works
Let me break down the science real quick.
The cornstarch coating creates a barrier that:
- Keeps moisture inside the beef
- Gets crispy when it hits hot oil
- Helps the sauce cling to every piece
High heat causes the Maillard reaction, which:
- Browns the meat
- Creates those deep, savory flavors
- Gives you that restaurant-quality crust
Slicing against the grain literally cuts through the tough muscle fibers, making each bite tender instead of chewy.
The sauce ratio (½ cup soy sauce + ½ cup water + ⅔ cup sugar) creates the perfect balance of sweet, salty, and liquid that reduces into a glaze without getting too thick or too thin.
See? It’s not magic. It’s just smart cooking.
Kid-Friendly Adjustments
Got picky eaters? Try these tweaks:
| Adjustment | Why Kids Like It |
|---|---|
| Skip red pepper flakes | No spice = happy kids |
| Cut beef into bite-sized chunks | Easier to eat with fingers or fork |
| Serve with plain white rice | Familiar comfort food |
| Add a little honey | Extra sweetness kids love |
| Let them sprinkle sesame seeds | Interactive and fun |
Meal Prep Strategy
Planning to make this for the week? Here’s your game plan:
Sunday:
- Slice all the beef
- Make the sauce
- Store separately in the fridge
Monday-Thursday:
- Cook fresh each night (takes 15 minutes)
- Or cook a double batch Monday and reheat
Friday:
- If you meal-prepped Monday, you might be sick of it by now 😅
- Make something else
Pro Move: Cook the beef and sauce separately, then combine when reheating. This keeps the beef from getting soggy.
Wrapping Up
So there you have it.
Restaurant-quality Mongolian beef that you can make on a random Tuesday without breaking a sweat.
Once you nail this recipe, you can tweak it however you want. Less sweet, more spicy, different proteins, extra veggies.
It’s one of those dishes that’s super forgiving and always turns out delicious.
Now go make it, take a picture of your glossy, gorgeous beef, and come back here to tell me how it went.
Did you add extra garlic? Did you try it with chicken? Did your family demand you make it again next week?
Drop a comment below and let me know. I love hearing how these recipes turn out for you. 🍜